Showing posts with label entrees. Show all posts

Thursday, October 12, 2017

Your Nachos Will Never Be the Same!


What could be better during football and hockey season that a big plate of nachos, amiright? Well, I do have something better, and you will be making it again and again, I promise!

It actually started with some leftover brisket from Monk's BBQ in Purcellville, VA. The best BBQ in the area, in my opinion. Actually, if you ever get out there, just get whatever is on their specials menu, otherwise you will have regret, because you won't be able to go back and get the thing again. Trust me, I know from experience.

Anyway, back to the leftovers. So I had a little of this, a little of that (including Monk's homemade pickles), so I thought, "Maybe I should make totchos with all of this stuff," you know, trying to stretch out what I could so that the whole family could have some. What are totchos, you ask? They are nachos, but made with tater tots. Yes, you read that right: Tater. Tots. I'll give you a moment to let that sink in...

So, I lined up my varied (some might say motley) items to turn into my bbq totchos:


I threw the tater tots in the oven to bake as directed on the package (I made the whole bag, natch). Once they had baked for half the time, I turned the tots, then scattered the chopped up brisket on top. while that finished, I chopped up the scallions, pickles and tomatoes (any kind will do - I just happened to have grape tomatoes to use up).

I also went fancy and made a cheese sauce:

1 Tbsp butter
1 Tbsp flour
1 cup of milk (approx.)
1 cup grated cheddar cheese (I used what I had on hand, so it ended up being a mix of white and sharp cheddar)
Salt and pepper to taste

Melt butter in a medium saucepan, then add flour and whisk until no lumps are in the flour and the mixture forms a smooth paste. Cook for a couple of minutes (set the timer for 2 minutes if you need to be precise, but it's just to cook the "flour-y" taste out), then slowly add the milk, whisking constantly. Keep whisking and cooking the white sauce until it is smooth and starts to bubble. Once it's thickened, whisk in the cheese and continue whisking until smooth. If the sauce is too thick, you can add a little bit more milk. If too thin, add more cheese. The sauce should be pourable, but not too runny (a little thicker than buttermilk pancake batter). Season with salt and pepper to taste.

OR, you can skip this step and just scatter shredded cheese on top of the brisket then put the sheet pan back in the oven. I made these both ways (cheese sauce vs. shredded cheese) and the boys liked both versions. I'm giving you the option. :-)

Once the tater tots are done, pull the sheet pan out of the oven, then pour cheese sauce over the top (if you didn't go the shredded cheese route), topped by the scallions, tomatoes and pickles. Those are the toppings I used, but feel free to be creative and share your favorite "totcho" toppings in the comments!


Serve and enjoy!  You might end up fighting over the last of the tots. Don't say I didn't warn you!

One final note: If you don't happen to have leftover BBQ, feel free to make your own in the slow cooker: Put a pork shoulder (pork butt) in the slow cooker (probably about 6 lbs, but it could be less, that's just what fits in my cooker), then top with your favorite bottle of BBQ sauce (16 oz). cover and cook on low for 8-10 hours, until it is pull-apart tender. Once you have this made, you can freeze leftovers (there will be a lot), or just make sure you have a plan for the week to use up the rest -- grain bowls, sandwiches, tacos, what have you.


Tuesday, November 4, 2014

Crazy Days


I can't believe that a month has gone by between blog posts!  I thought my PTA duties would lighten up a little once we got past the beginning of school, but I was wrong. Really, really wrong.  So, as much I actually like the stuff I'm doing as PTA secretary, it is taking a lot of my free time, which means a little less time to tackle anything complicated for meals. I know, however, that I'm not the only one who is busy, with kids, with work, with STUFF.  Life happens, and keeps happening, but that's no excuse to slap some spaghettios in a bowl and call it dinner (not that I am judging -- I have a couple of cans of it in my pantry, too, but I just call it lunch or a snack for the kids).

My mom, a single mother of three who worked as a nurse, is a great cook, but when we were kids, she didn't have time to do fancy stuff, either.  I distinctly remember her 3-day soups.  She would make a big pot of soup, put it in the fridge, and that's what we would eat for three days.  It was especially useful when we were in high school and coming home at different times.  Whenever we needed to eat, we would just heat up some of that soup!

What do I do when I know a crazy week is coming up?  Riffing off of my mom's three day soup idea, I make a big pot of chili! It's super-versatile.  The first night, you have the chili straight up with all the fixin's: cheese, onions, sour cream (or plain Greek yogurt), cilantro.


Now, you could just freeze the rest and take it out for some other night when you're pressed for time.  I, however, used it another night that same week to make chili-mac, which is spaghetti topped with chili.  I got this idea from a summer I spent in Cincinnatti, a city known for its unique chili (they add cinnamon to it) and how they eat it. They have several different ways to enjoy chili: straight up in a bowl, two-way (with spaghetti), three-way (chili, spaghetti, and cheese), four-way (chili, spaghetti, cheese, and onions) or five-way (chili, spaghetti, cheese, onions, and beans), although, of course, my chili always has beans in it anyway. :-)  Any way you order it, though, it's delicious!  Chili is truly one of my "desert island" foods. I could seriously eat it every day.

There are other ways to use your pot of chili, besides just eating it.  Top it with cornbread batter and made a kind of tamale pie. Here's a recipe from Martha Stewart, but I just use the Jiffy mix in a box when I'm pressed for time.
Cornbread-and-Chili Pie

Another thing you could do with your chili is top a baked potato with it, or a cheese quesadilla (yum!) or make loaded nachos if the chili isn't too soupy. I feel a little like Pvt. Benjamin Buford 'Bubba' Blue from Forrest Gump, but you get the picture!

All of that from one pot of chili!

What are your go-to tips and tricks to get you through an especially crazy week?


Sunday, September 21, 2014

Sweet-n-Spicy Marinade: Saying Goodbye to Summer


Even though it's officially the last day of summer, we are hanging on to the last remnants of the season here in Northern Virginia, where it could reach the upper 80's today.  We've had some great weather the past week.  Luckily, my friends' gardens are still producing, and I am fortunate that they are generous, because it gives me a chance to use ingredients I wouldn't normally buy. For example, one of them gave me a couple of habaneros. I have never used them before, but I knew they were hot - they have heat, but still have a light, citrus-y flavor.  I thought a sweet and spicy marinade might be good.  I added honey and a little water to keep the heat from getting to be too much, and a little smoked paprika for depth.  I think it's a great combination of heat and sweet.

This marinade was good with chicken (marinated for about 3 hours), but I think it would taste great on shrimp, too.  Maybe even tilapia for fish tacos.  Be careful when marinating seafood, because the acid from the lime will start to cook the fish/shrimp, ceviche-style.


Another note: I would recommend grilling or broiling over pan-frying, just because the honey in the marinade will start to burn on the pan before the meat is done.  Here is a gnarly picture of the pan as I was cooking the chicken:


The chicken itself didn't burn (it tasted awesome) but when the marinade hit the heat, that honey made it really dark.

Sweet-n-Spicy Marinade

Ingredients:

1 habanero pepper (could use jalapeno if that's what you have)
1 lime
2 cloves garlic
2 Tbsp honey
1/4 cup water
1/2 bunch of cilantro, stems and leaves, rinsed
1/2 cup olive oil
(you could also add a little soy sauce or salt, if you like)


Cut the pepper in half and remove seeds and ribs inside the pepper (most of the heat of the pepper is held in the ribs, secondarily the seeds).  Drop pepper halves into a blender.  Cut lime into quarters, squeeze juice into blender, then toss the rest of the lime in.  Peel and coarsely chop garlic, add to the blender, along with honey, water, oil and cilantro.  Cover blender and puree all ingredients until nearly smooth (there should still be small bits, and that's okay).  Pour marinade over protein of choice.  I used boneless, skinless chicken thighs, but shrimp or tilapia would be good (no more than 20 minutes -- the lime juice will start cooking the meat - kind of like ceviche).  Pork would also work. Marinate pork or chicken for about an hour, but a little longer isn't going to hurt, either.


The family liked this one -- even my younger son, who is usually sensitive to spicy stuff.  The flavor of this is not punch-you-in-the-face spicy. It's subtle and light and doesn't linger on your tongue too long.  Hope you like it!

Friday, January 17, 2014

Savory Dutch Baby

This one's another entry in the "I'm not sure what to make, so I have to punt" dinner.  I had a bunch of egg yolks left over from the meringue experiments (see previous post), but I didn't feel like scrambled eggs, so I thought about a savory dutch baby.  A dutch baby (or oven pancake, pfannekuchen, etc.) is a simple mixture of egg, milk, flour, and salt (sometimes you add sugar for a sweet version) that's poured in a hot, buttered pan.  It's baked at a high temperature and gets all beautiful and puffy.

I've made these before, but only the sweeter version, served with either sauteed apples or maple syrup, and usually for Sunday breakfast.  This time, however, I had some cheese and bacon (what a surprise!), so I thought, "Maybe I should just add some of those and make it a savory dinner."

Let me tell you what.  It was GOOD!  A little side salad, and you've got a light dinner or lunch.  Plus, it's really easy.  Try it.  You'll like it!

Savory Dutch Baby with Bacon and Gruyere

2 Tbsp. butter
2 eggs
1/2 cup milk
1/2 cup flour
3 Tbsp bacon bits
handful of shredded gruyere cheese

Pre-heat oven to 400 degrees (F). Put butter in a 9-inch cast iron skillet (you can use a pie plate or other oven-safe 9-inch skillet) and put in the oven to melt.  Meanwhile, whisk together eggs, milk and flour until smooth.  When the butter is melted and the oven is pre-heated, pour the egg mixture into the skillet.  Return to oven and bake for 18 minutes.  Pull out the skillet and sprinkle the bacon and cheese on the pancake.  Put the skillet back in the over for 10 more minutes, or until the pancake is golden brown and the cheese is melted.

Remove the skillet from the oven, cut pancake into four pieces.  Serve with a simple side salad.


Friday, January 3, 2014

Two for One: Making weeknight meals easier


I am all about easy prep and quick weeknight meals.  An easy way to make dinner happen is to prep ingredients ahead of time, then all you have to do is throw everything together and voila! Dinner is done.  For example, this week I made a sausage and cheese strata, but cooked all of the sausage (one pound's worth) and saved the other half to put in a soup later in the week.  Similarly, I bought a whole head of savoy cabbage, but used it three ways (in a citrus slaw with roasted salmon, in soup, and as a side dish).  Makes easy work for weeknights AND it's economical.

Here's what I did:

I cooked all the sausage, along with half a chopped up onion and 4 oz. of chopped, fresh mushrooms. Beause there was some great crispy bits of sausage left in the pan, I put half a cup of water in the hot pan to scrape up all those bits of flavor, then put everything in a bowl and stored it in the fridge for later.
 

When it came time to make the strata, I ended up only using about 1/3 of the sausage, which I scattered over a mixture of 4 eggs, 1 1/3 cups of milk, salt and pepper, 5 slices of thick-cut bread (cut into 1-inch cubes) that had soaked together for about 15 minutes.  On top of everything, I scattered some grated cheddar cheese, then baked it in a buttered 8-inch by 8-inch pan at 375 for about 30 minutes (until the top was golden brown in places and the cheese was all melted).


The next night, I took half a head of savoy cabbage (it was a large head), sliced it into 1/2 inch thick slices, then sliced those slices across into 2-inch lengths.  I also took a whole onion, cut it in half length-wise, then sliced across in thin (1/4 inch) slices.  I tossed the cabbage and onions with salt, pepper, and some olive oil and roasted it on two large baking sheets in the oven at 400 degrees for 12 minutes (some of the cabbage might get dark brown, and that's okay), tossing the veggies once about halfway through.


With one pan of the cabbage, I tossed it with a little soy sauce and sesame seeds and put it away for a snack, some lunch or for a side with another dinner later in the week.

With the other pan of cabbage, I added that to a 4-quart pot, which was already simmering with 32 oz. of chicken broth and the rest of the sausage mixture that I made the day before, with a little bit of dried coriander (about 1/4 teaspoon) and dried marjoram (1/2 teaspoon).  After I added the cabbage to the pot with the other ingredients, I let them simmer together for about 10 minutes, just to let the flavors unite.


And there you have it!  Actually, the original recipe I was using was supposed to have some sweet potato in it, but I forgot.  It was okay, though, because it was still really tasty and even my picky eater liked it!

Sunday, September 22, 2013

Pintester Challenge: Meat. Balls.

So, it wouldn't be a Pintester Challenge without inappropriate references and childish sniggering over innocuous words (like, "duty" gets me every time).  So today I made meatballs.  Let the sniggering begin.

I have to admit that I'm pushing up against the Sunday, Sept. 22 deadline, so I can't be very witty or snarky. I just need to get this shit done, so here's what happened:

I found this pin for Thai Green Curry Meatballs on Mel's Kitchen Cafe:

Thai Green Curry Meatballs


I mean, who doesn't like a good meatball (snigger)?  And I like curry, especially green curry, so I thought I'd give it a try.  Here's the deal. They were delicious!  Sorry, no fails, no ball-rolling nightmares (har har).  Just full on goodness. :-)  I did change up the recipe a little by decreasing the oats (hate too much filler) adding finely minced carrots (I try to get veggies into my kids any way I can) and baking the balls (ha!), 'cause mama ain't got time for sauteing in batches. But other than that, made it just like the pin. ;-) True confession, though. One of my kids didn't like the sauce, but liked the meatballs.  I still count it as a win.

Here's my version:


Thai Green Curry Meatballs (adapted from Mel's Kitchen Cafe)
YIELD: SERVES 6 
INGREDIENTS
    Meatballs:
  • 3 large eggs
  • 1 cup rolled oats
  • 1/4 cup milk
  • 2 pounds lean ground beef or turkey
  • 1/2 cup finely minced carrots
  • 1 tablespoon minced fresh ginger
  • 1 tablespoon Thai green curry paste
  • 2 tablespoons fish sauce
  • 1 teaspoon sugar
  • 1/2 cup chopped cilantro
  • 1 1/2 teaspoons salt
  • 2 cloves garlic, finely minced
  • 3 green onions, white and green parts finely chopped
  • Sauce:
  • 2 cans (13.5-ounce each) unsweetened coconut milk
  • 2 tablespoons green curry paste
  • 1/2 tsp. sugar
  • 2 tsp cornstarch stirred into 1 tsp cold water to make a slurry
  • 1/4 cup lime juice (from about 2-3 limes)
  • Hot cooked rice for serving
DIRECTIONS
  1. In a large bowl, combine the eggs, oats and milk. Let the mixture stand and soak for 5-10 minutes. Add ground beef or turkey, carrots, ginger, curry paste, fish sauce, sugar, cilantro, salt, garlic and green onions. Mix to combine and distribute all the ingredients through the meat. The best way to do this is to use your hands. Really.  Just get in there and squish everything around.
  2. Heat oven to 375 degrees. Line a large baking sheet with parchment paper.  Roll meat mixture into balls (about golf-ball size - I like big meatballs) and place onto lined baking sheet.  Once all the balls have been rolled and placed on the sheet, bake in the oven for about 20 minutes.
  3. While the meatballs bake, heat a large skillet to medium heat and stir in the coconut milk, green curry paste and sugar. Bring to a simmer, then add the cornstarch mixture and stir to combine.  Cook on low heat until thickened.  
  4. When the meatballs are done baking, pull them out of the oven and place the meatballs in the skillet with the sauce. Go ahead and pile them all in, trying for a single layer. Simmer the meatballs and sauce for 8-10 minutes until the meatballs are cooked through, flipping the meatballs once or twice.
  5. Stir in the lime juice. Add salt and pepper to taste. Serve over hot, cooked rice.

See? These directions just write their own jokes, really.  Giggle away, friends!

Does this qualify for the Pintester Movement? I'm pretty sure Sonja, the original Pintester, didn't make this, but I don't have time to search through her pins and find it (or another pin she DID do), so I'm submitting this anyway. It IS something that I pinned, but I'm not sure that counts. Personally, I consider this a public service, because it's one less dinner you have to think about.  You're welcome. Seriously, though, you have to make these Thai balls (snort)!

Friday, August 23, 2013

Tuna Melt O' My Heart!


What is it about tuna melts?  They are so comforting and delicious, but I rarely make them. Maybe I just sort of forget about them, until I need something for dinner when I haven't planned anything else.  Tuna melts to the rescue! And please don't get on me about the dry mini-carrots. I told you, I didn't have much else, so we had to do with what we had. Deal, people.  My life is not picture perfect.  :-)

I don't usually have English muffins on hand, so that was really the only thing I had to buy specifically for this recipe. If you don't have actual English muffins, you could do this just on regular bread, too.  Same technique will work for both.

Surprisingly, even my picky eater ate two of these, so you might want to try it with your kids (they even at those dry carrots).  Make sure they wait a little for the cheese to cool, otherwise they might burn the tops of their mouths.  Happens to me almost every time!  :-)

For a non-dairy variation, I broiled one without cheese, then added sliced avocado after I took them out of the oven.  It was delicious, and I didn't miss the cheese (much) at all!

And, in case you don't have either of these tools, you really need to get them if you like to eat tuna salad.  The Pampered Chef can opener and can strainer are fabulous!!


Tuna Melts, My Way


2 cans white albacore tuna, packed in water, drained
two big spoonfuls of mayonnaise (approx. 1/3 cup)
1 stalk celery, small (1/4 inch) dice
2 green onions, chopped fine
1 heaping Tbsp sweet relish, or about 5-6 sweet midget gherkins, diced small
a squirt of fresh lemon juice
Salt, pepper (to taste)
3 English muffins, split
butter
6 slices of cheese (I use American because it melts smoother)

Combine the first 6 ingredients in a bowl (or you can just use your own favorite tuna salad recipe). Stir together to completely incorporate (you might have to smash through some of the larger chunks of tuna).


Turn on broiler.  Place English muffins on a rimmed baking sheet.  Butter lightly (you can skip this part and just toast them dry if you want).  Toast muffins under broiler (pan should be about 4-6 inches away from the heat), about 1-2 minutes.  You just want a little color on them so the middle doesn't get too soggy when you put the tuna on it.  Pull the muffins out of the oven.

Top the muffins with the tuna salad, then top with slices of cheese. I cut the squares down a little smaller, because I don't like having the cheese melt over the sides, dripping down and then burning on my pan, but that's just my Type-A quirkiness shining through.


Put the tuna melts back under the broiler for about 2 minutes, but keep an eye on them. You don't want the cheese to burn, just melt (hence the name of the dish).  :-) When the cheese starts to brown and bubble, pull the tuna melts out and serve.


Sunday, December 23, 2012

My Famous Chili


I have to admit that I use the term "famous" loosely, because my chili is different every time I make it.  But people still seem to like it, so I tried to write down an actual recipe this time. You see, I make chili a lot! It's probably my "desert island" food (you know, if you were stranded on a desert island, what food would you want to have...).  I honestly could eat it every day.  So I've definitely developed particular likes and dislikes.  But what I like most about it is chili's seemingly unending variations.  Which brings me back around to why my chili is different every time.  I am constantly switching up the types of seasonings and chiles I use, so it's really never the same  thing twice.  

I realize that chili doesn't seem particularly "Christmasy", but we always had it as part of Christmas day dinner.  I don't know why, exactly.  Maybe it was because Mom was too tired to cook a huge meal, and everyone was tired from getting up early and opening presents?  Anyway, it was part of our holiday tradition, so I thought I would share.  This is not my mom's chili, however.  Hers had celery in it.  As a kid, I didn't know any better, but now I do.  So no celery in my chili, ever. But this recipe is more of a guideline. You can adjust it to your personal heat preferences, meat choice, or even make it vegetarian (add more veggies -- red, orange, yellow bell peppers, portabello mushrooms add an almost meaty texture, more beans, use vegetable broth or water instead of chicken stock). Some purists would say that there shouldn't be any beans in a chili, ever, so there are a lot of views and variations.

Here is what I put in my chili tonight, because, frankly, it's what I had (minus the corn, which was most likely still in the freezer...).  The small container at the bottom of the picture holds my frozen chipotles in adobo, because I never use an entire can at one time (or at least I've never seen a recipe that does it).


So, hopefully, you'll find this as tasty as I do, but feel free to tweak it according to what you and your family like.  I don't mind at all.  :-)


Marna's "Famous" Chicken Chili

Ingredients:

1.5 lbs chicken breast, cubed into bite-sized pieces
1 tsp. Penzey's Mitchell Street Steak Seasoning (you can use chili powder as a substitute)
2 dried guajillo chiles
1 dried anaheim chile
2 cups chicken stock (plus additional)
2 medium onions, 1/4 in dice
2 garlic cloves, minced or pressed
1 tbsp oil (I used olive, but you can use canola, too)
1 tbps chopped chipotle in adobo sauce
2 tbsp tomato paste
1 green pepper
1 14 oz can black beans
1 28 oz can diced tomatoes
1.5 cups fresh or frozen corn

Heat  a cast iron skillet (or 5 qt dutch oven if you just want to use one pot) over medium-high heat.  Put dried chiles in pan (dry -- no oil or anything) and heat the chiles until fragrant (about 5 minutes or so), using tongs to turn over once.  Meanwhile, heat 2 cups chicken stock. When the chiles are warm and fragrant, pull them off the heat and cut off the stem.  Pull out the seeds (most of them should just shake out, but you might have to rip open the chile to get at the ones still attached to the ribs).  Put the chiles in the warm chicken broth and let soften for 10 minutes. Once softened, put the chiles and the chicken stock in a blender and add the chipotle.  Blend (take out the middle of the cover if the chicken stock is still hot) until smooth.


While the chiles are soaking, in a soup pot or dutch oven (if you didn't use it for the chiles) cook the chicken breast, seasoning with salt and the Mitchell Street Steak Seasoning, over medium heat until cooked through, about 5-8 minutes. Remove the chicken from the pot and set aside.  Add the oil, onions and garlic.  Cook until softened, but stir occasionally so the garlic doesn't burn.  Add the tomato paste and cook until carmelized (it will start smelling sweet and turn dark, dark red -- almost brown), then add the green pepper.  Cook for 2 minutes, then add the pureed chiles and chicken stock, chicken (with any accumulated juices), tomatoes, and black beans.  Add more chicken stock if the mixture looks too thick.  Cook for 30 minutes, then add the corn.  Cook until the corn is warmed through (it should only take 2-3 minutes).

Serve with the usual accessories: cheese, sour cream, cilantro, chopped red onion (or spring onions)...or nothing at all.  This chili has layers of flavors that you'll enjoy all by itself.

This recipe makes a generous amount.  Probably enough to serve 8 as a main entree.  Maybe a couple more if you serve it with corn bread or on top of spaghetti (chili mac).

Tips and Hints:

Chipotle chiles in adobe can be found in the international or Latin section of most groceries.  You will usually have a lot left over, so I freeze mine, then scrape off what I need for whatever recipe I'm making.

This makes a medium-spicy chili (it had a kick that builds on your tongue, but it shouldn't make you cry or sweat).  You can adjust the heat of the chili by reducing the amount of dried chiles, or leave out the chipotle, if you like.

I think chili is better the next day, after the flavors have had a chance to more thoroughly blend.  Just let cool on the stove top for a while, then put the pot in the fridge overnight.  Re-heat the next day.  A word of caution, though.  The spiciness will also intensify, so adjust for your personal preferences accordingly.


Monday, August 27, 2012

A Chicken in Every Pot

Or, in this case, every oven, because today, dear readers, you are going to learn how to make the best roast chicken ever.  Personally, I think being able to roast a chicken is one of those basic things that everyone needs to know how to do.  And here's a secret: it's not that hard, I promise.

The important part of roasting a chicken is making sure it stays nice and juicy, without the breast meat drying out to sawdust. "Easier said than done," you say. I'm sure there's a lot of science and stuff behind all the theories of what temperature and how long and all that, but all I can give you is what my experience has shown me, which is hight heat, then lower heat.  Bam!  That's it, really. Oh! and fat.  But we'll get to that in a minute.

Some of you might be saying, "Wait!  Don't you have to truss the bird?" Well, my friends, I'm going to confess that, no, I don't always truss the bird. If someone can show me that it actually makes a difference in how it turns out, I will keep an open mind, but I have had good results, regardless of whether I'd strung up the chicken or not.  There you have it, folks.  Another myth, busted.

The other key to success, for me, is having a meat thermometer that you can put in the chicken while it's in the oven. I like the kind that keeps the read out on the stove, with the probe (hate that word) in the chicken while it's still in the oven.  Here's my thermometer:


Now, you don't have to have that to make great roast chicken, but it takes a lot of the guesswork (and too many opening and closing of the oven door) out of making sure the thing is done. It's not that expensive and lasts a long time (I've had mine for nearly 15 years and counting).

Just one more thing before we get to the actual recipe: people will get in a lather over is whether the chicken is organic or not.  Honestly, I can't taste much of a difference, but if I can afford organic or locally-raised, that's what I would go for.  Mainly because I like to eat the skin, so I hope that the organic stuff has fewer nasty things lurking around the skin and fat.  That being said, I have eaten, and roasted, plenty of non-organic chickens and lived to tell the tale, so I'm not making judgements one way or another.  Just one more thing to note, though.  Some chickens might have additional brine/salt-water injected into them, so this affects the saltiness.  If the package says anything about salt solutions or injections, be careful about the additional salt you rub in to the skin.

Okay, on to the recipe...


Easy Roasted Chicken

1 3-4 lb chicken, patted dry
Large bunch of herbs (thyme, rosemary, parsley are best, either one or a mixture), rinsed and patted dry
2-3 Tbsp butter (softened) or olive oil
2 lemons, quartered (before you quarter them, peel off some of the lemon rind, about 1 tsp)
Salt and pepper
1-2 onions (one if the onion is very large, otherwise you might need two if they're small-sh), peeled and cut into 1-inch pieces
Other assorted veggies if you like

Preheat oven to 450 degrees (F). While the oven is preheating, combine the butter (or olive oil), lemon peel, salt and 1 tsp of herbs. Rub the chicken with the butter mixture, making sure to get all surfaces, plus rub a little under the skin covering the breasts.  Alternatively, you can just tuck the lemon peel and herbs under the skin, then rub the plain butter or oil over the skin.  Rub some salt and pepper (the amount is up to you) onto the chicken as well.


This was my abbreviated version -- just rubbed the butter on the skin (unfortunately, my butter wasn't softened, so it was more clumpy)....


Toss the onions, half a lemon (chunked up) and any other veggies you want to use (I'll sometimes roast carrots and potatoes with the chicken) in the bottom of a roasting pan, then place the chicken, breast side down, on top of the veggies.  The vegetables will act as a sort of rack to allow some heat to circulate under the chicken.  Loosely stuff the cavity (be sure you have taken out the little package that had the neck, liver, and heart -- but save the neck for later, we're making chicken stock!) with herbs, a couple of pieces of lemon and a few pieces of onion (you can also use cloves of garlic instead of the onion, if you like). Be sure not to stuff the cavity too tightly, though, because it will make it harder for the chicken to finish cooking. You will want the heat to get in there as well.

Put the chicken in the oven, rack in the center, and bake at 450 for 20 minutes.  After 20 minutes, flip the bird (ha!) over, so that the breast is up, insert the thermometer in the thigh and close the door.  If the skin is looking dry, feel free to baste the chicken using some of the juices in the pan, but you should only need to do that once.  Try to keep the oven door closed and the heat in.  Reduce oven temperature to 375 degrees (F) and bake for about 40-50 more minutes, or until the thermometer registers 170 (degrees F).  If you don't have a meat thermometer, check doneness by moving the chicken leg -- it should move easily and nearly separate from the thigh bone if you twist it.  You can also pierce the thigh with a fork or knife -- if the juices are clear and not at all pink, it should be done.

Remove the chicken from the oven, then tent with a large piece of foil and let rest for 15-20 minutes (the foil should be laid loosely over the chicken, still in the pan, to let some of the steam escape -- don't wrap the foil around to completely cover).


There you have it!  That's all there is to it.  Quick prep, then let it sit in the oven.  And beats the crap out of those rotisserie chickens at the store that have been sitting around all day.  Oh!  And save the chicken carcass (bones) when you are done.  You can use that to make your own chicken stock later.  I'll show you how!


Also, all that dark stuff that looks burnt on the bottom? Save that, too, because it's going to help flavor the chicken stock. Yum! As you can tell, I've already started picking at the chicken skin.  It's so good!

Saturday, July 14, 2012

The Recipe I Wanted To Hate


 There I was, planning meals for the week, when I asked my oldest son what he might want to have for dinner this week. I happened to be looking at my Southern Living cookbook at the time.  Big mistake.  He saw a picture of a recipe called "Smothered Enchiladas."  The son, who is a pretty healthy eater (actually chooses and eats salad at school for lunch) and generally does not like very gooey, creamy stuff, wanted these crazy creamy, smothered enchiladas.  I looked at the nutritional information per serving, which was one burrito: 712 calories (65% from fat), 51.3 g fat (nearly half of which was saturated). Gah! 

Against my better judgement and, because I love my son and he actually showed some interest, I told him I would make them.  Friends, I have to confess, this recipe made me do things.  Horrible things that I never thought I would ever do.  Like buy Cream of Chicken soup and use it with ground beef.  Like buy reduced fat cheese and light sour cream, in the desperate attempt to make this less fat-laden than a Big Mac with fries. The only redeeming ingredient in this thing was the green chiles, and it was a very small can.


 Here's the recipe from Southern Living for Smothered Enchiladas:

2 lbs. ground beef
1 (1 1/4 oz) package of mild taco seasoning
1 (4.5 oz) can chopped green chiles, divided
2 (10 3/4 oz) cans cream of chicken soup (I substituted 1 cup of 2% evaporated milk for the 2nd can of soup)
1 (16 oz) container sour cream (I used light)
8 (8-inch) flour tortillas
2 cups (8 oz) shredded cheddar cheese (I used 50% reduced fat cheddar)

Garnishes: salsa, sour cream, green onions, chopped fresh cilantro

Cook ground beef in a skillet, breaking up bigger chunks, until it crumbles and is no longer pink. Drain off any fat. Stir in taco seasoning mix and half of the chopped green chiles. Set aside.

Stir together remaining chiles, soup and sour cream.  Pour half of sour cream mixture in a lightly greased 9x13-inch baking dish.  Spoon beef mixture evenly down center of each tortilla.  Roll up and place tortillas, seam side down, over sour cream mixture in baking dish.


Here is my tortilla-filling and -rolling set up.


Spread remaining sour cream mixture over the tortillas and top with grated cheese.

Bake, uncovered, for 25 minutes in a 350 degree oven.  The enchiladas should be heated through and bubbling around the edges.  Garnish, if desired.  Serves 8.

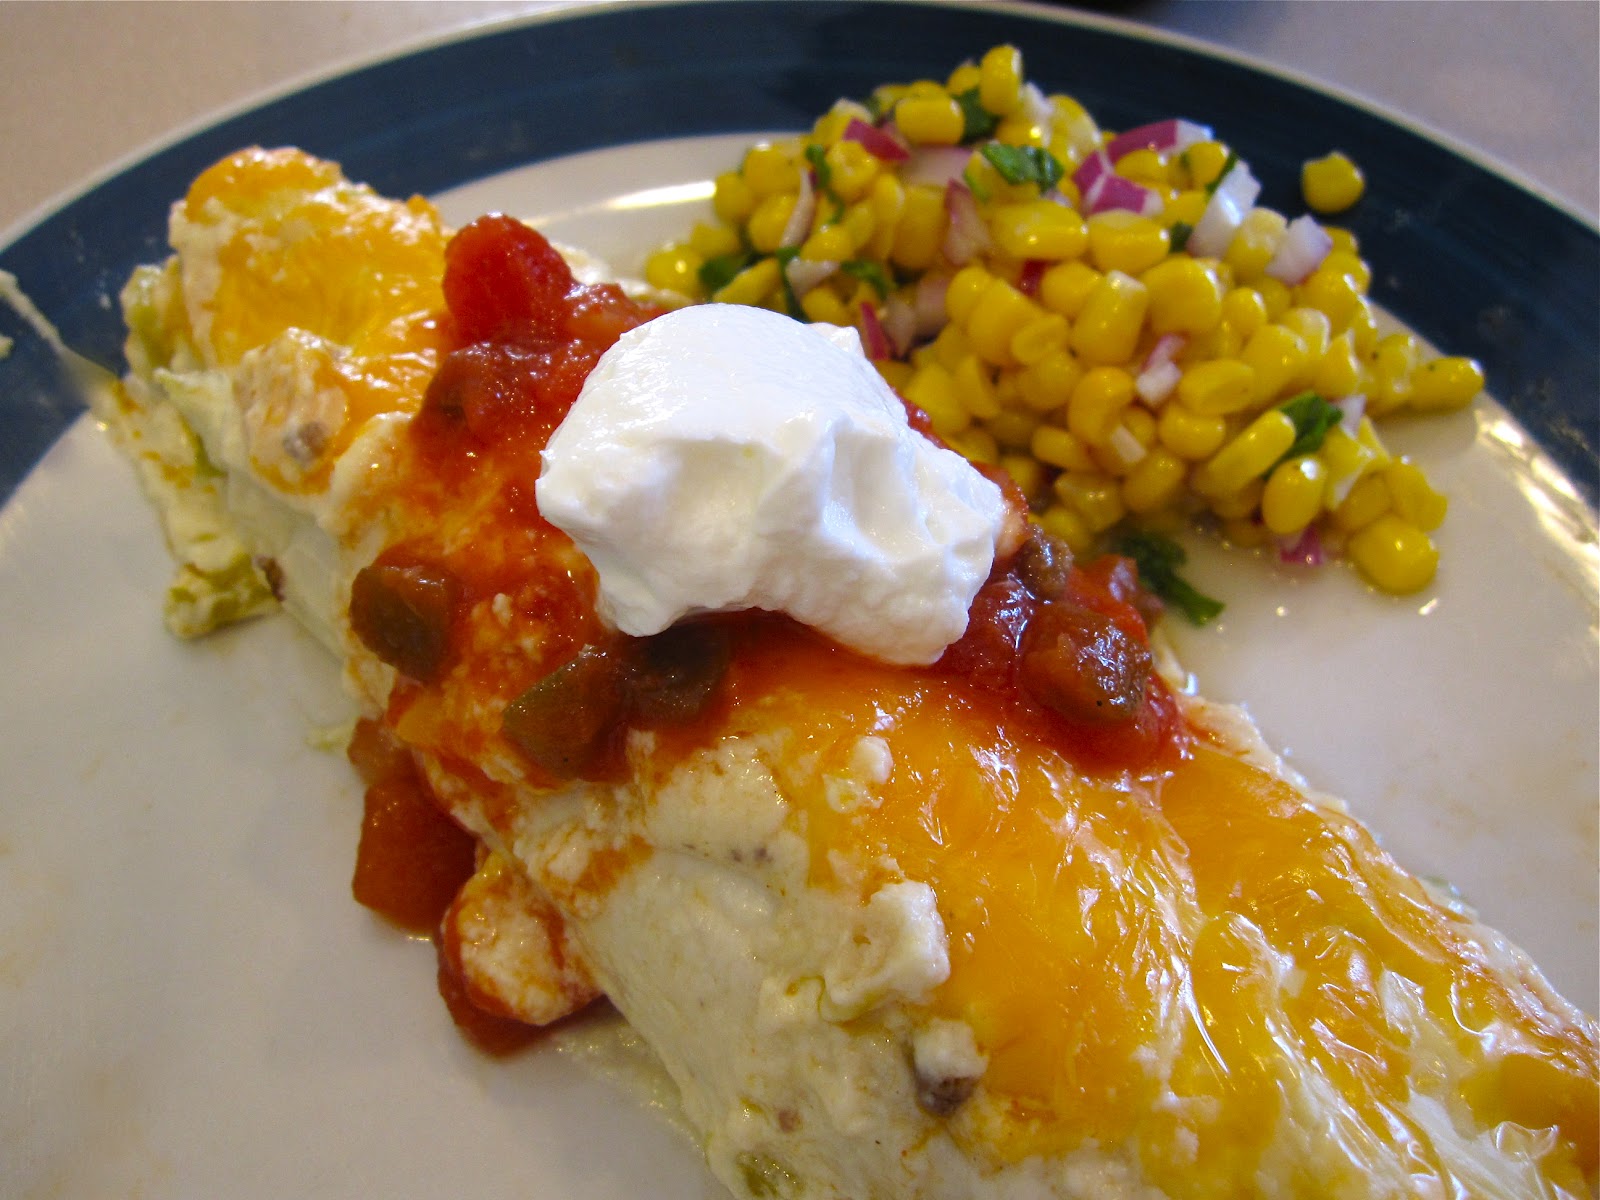
I ended up only being able to fit 7 in the pan, but for my family of 4, it was plenty, with almost half left over. These are really filling, and actually pretty good.  You couldn't even tell I used reduced fat stuff.  And it was really good with salsa on top -- the acid from the tomatoes help cut through the richness.  Knowing that we needed vegetables with this thing, I made my favorite corn salad recipe.  I doubt I will ever make this again, unless someone asks for it for their birthday, maybe.  But I thought I would share, if only to serve as a cautionary tale: don't give your kids an open-ended question like: "What do you want for dinner?" You might not like the answer...


Tuesday, May 15, 2012

Comfort Food


Some of my friends have asked why I haven't posted many baked goods, and, admittedly, that is what I love to make.  My waistline, however, doesn't appreciate all the yumminess.  I have a problem with self control and eating delicious food.  Yet, I'm writing a food blog.  Go figure.

I promise I will do more of the baking stuff, and have actually done quite a bit of baking this past week (scones, cinnamon rolls, pie). Just not anything original.  So, I really will get more baking posts on here, but in the mean time, I wanted to post a recipe that is one of my favorites.  I grew up on goulash (and soon I'll make my grandma's recipe for hamburger goulash), and it's one of my favorite comfort foods.  What, exactly, is goulash?  Honestly, I'm not sure what the technical definition is, but when I was growing up, it meant something warm and comforting, with meat, onions, mushrooms, sometimes tomatoes, lots of paprika in a wonderful broth that was perfect for sopping up with bread or scooping with noodles or soaking in to buttery mashed potatoes. This recipe is for a sort of chicken goulash/chicken paprika hybrid and it's something I made up, with a nod to my eastern European heritage. I just estimated the spices, so feel free to play with that, depending on your taste preferences.

While you can probably make this without the smoked paprika, I wouldn't recommend it. Smoked paprika gives a nice smokiness and depth to the dish without adding heat.  Also, you can do this without the white wine, just use more chicken broth.

Chicken Paprika Goulash

3 boneless chicken breasts (about 1.5-2 lbs), cut into 1/2 in strips
2 Tbsp oil
salt and pepper
2 large or 3 medium onions, peeled
1 lb. sliced mushrooms
1 Tbsp + 1 tsp sweet paprika
1 1/2 tsp smoked paprika
1/2 cup white wine
2/3 cup chicken broth
1 Tbsp corn starch
1/4 lemon
Wide Egg Noodles, cooked (or mashed potatoes)
Sour Cream (optional)

Heat oil in large saute pan over medium-high heat. Season chicken strips with salt and pepper, then brown chicken strips in oil (should take about 5 minutes). Remove browned chicken strips and set aside. Turn heat down to medium, and in the same pan, add the onions and cook until starting to soften.  Add mushrooms and cook until mushrooms start to release their water (about 2-3 minutes).  Sprinkle both paprikas over the onion/mushroom mixture and cook until the paprika is a deep red color, about 1 minute.


Add 1/2 c. white wine to pan and scrape up any browned bits off the bottom of the pan. Add chicken back to pan, along with any accumulated juices on the plate/bowl, plus 2/3 cup chicken broth (you can just eyeball it -- the liquid should not quite cover everything in the pan).  Cover and simmer approximately 8 minutes to cook chicken through.  Take 2 Tbsp of the cooking liquid out of the pan and put it in a small cup, let cool slightly -- it should only take a minute or so. Add 1 Tbsp cornstarch to the reserved cooking liquid, stir until smooth, then add back into pan with chicken and veggies. Cook for a minute or two to thicken. Remove from heat, squeeze the lemon over the chicken.  Serve over cooked wide egg noodles or mashed potatoes. I like to add a dollop of sour cream on my goulash, but the rest of my family doesn't.  I love the added creaminess, but do whatever you like.

Serves 4

Thursday, May 3, 2012

Refrigerator Roulette

Have you ever watched the TV show Chopped on the Food Network? In case you haven't, it's a show where 4 chefs compete against each other to make a tasty meal for 3 judges (one chef gets eliminated after each course).  The catch is that they have to use specific ingredients provided to them in a mystery basket.  Sometimes the ingredients aren't not so bad, but there's usually one crazy ingredient like chicken feet (appetizer round, and FYI, don't forget to clip the nails off) or blue cornmeal (dessert round). There was one episode where they had to use specifically use leftovers (I think leftover rice turned up at some point).  I could totally relate to that one!

Frankly, I don't see the huge challenge, 'cause I do something like that all the time.  After a few days of cooking, I always have a few odds and ends hanging out in the fridge.  And so it was that I found myself checking out the refrigerator for stuff that needed to be used up.  What did I find?  A cup of cream, some old bread (actually, that was in the freezer), ham and some smoked cheddar that I bought on a whim the week before.  Certainly not as crazy as chicken feet, but still.  What to make?  A strata, of course.

Strata is basically a savory bread pudding, with stale bread soaking up a custardy egg and milk mixture.  You can add whatever flavors you like. I adapted a recipe that I found on sticky gooey creamy chewy, a really fun blog, if you're interested in the original.  But the main thing is, a strata is pretty simple to make, and is a great way to use up extra ingredients that you might have lying around. I often buy a baguette or a ciabatta loaf and end up only using half, so, unless I have a plan for the rest of the loaf, I'll slice it and put it in the freezer.  That way, it's ready to go if I get an itch to make a strata, bread pudding, french toast, or just need some breadcrumbs.

A strata is pretty forgiving, as well. If you want a richer, eggy-er flavor, add another egg or two.  Don't have smoked cheddar? Regular cheddar is fine. Or swiss, or provolone (although I'm not sure you'd want to leave out cheese all together, but that's just me. I needs my cheese.)  Don't have spinach? Leave it out.  Like broccoli better? Switch it up.  My youngest son doesn't like cooked spinach, so I left it out of a couple of the layers.


Ham and Spinach Strata with Smoked Cheddar


Ingredients
  • 2 tablespoons butter
  • 1 medium onion, diced
  • about 12 slices of ham
  • 1 box frozen spinach, thawed and water squeezed out
  • 7 eggs
  • 1 cup milk (I used a mixture of cream and 2% milk)
  • 1 tablespoon Dijon mustard
  • 1/4 teaspoon salt
  • 1/4 teaspoon ground black or white pepper
  • 12 slices (3/4 inch thick) crusty, day-old/stale bread (baguette, ciabatta, batard)
  • 1 1/2 cup shredded smoked cheddar cheese
Directions
  1. Lightly butter a 3-quart ceramic baking dish with at least 2-inch high sides.
  2. Sauté onion in butter over medium heat until soft, about 5 minutes.  Remove from heat and set aside.
  3. Starting with the bread, layer one slice of bread, then a slice of ham, then a little of the spinach, repeating layers until you've used up all the bread, ham, and spinach.
  4. Scatter the sautéed onions on top of the layers.
  5. Whisk together the eggs, milk/cream, mustard, salt and pepper in a bowl.  Pour over the strata and let it chill in the fridge, covered, for several hours or overnight. (confession: I got a late start and only let it soak for a couple of hours. It turned out fine)
  6. When ready to bake, let strata sit at room temperature for about 30 minutes.  Preheat oven to 350 F. (here's another tip: if you forget to take the strata out of the fridge to get to room temperature, you can also just put it straight in the oven while it's pre-heating. I swear it won't blow up or anything)
  7. Bake, uncovered, on the center rack of the oven until puffed and golden brown, about 40-45 minutes. Let stand 5 minutes before serving.
Serves 6.

What creative stuff do you like to come up with to use up leftovers from the fridge?  Feel free to share your ideas!

Monday, April 16, 2012

For the Love of Pinterest

A friend of mind asked why people used Pinterest. What was the purpose? Now, I have wasted many hours looking at pictures and re-pinning fabulous-looking homes and clothes and food, maybe in the misguided attempt to create my perfect fantasy life. But what I use it for most is collecting ideas I see from other blogs and websites so that I can refer back them in one place.  It's really handy, in my opinion.  If anything, I get a little stressed thinking about all the great recipes I pinned that I haven't tried yet, so this weekend, I tried to put a dent in them and made a few recipes off of my "Yum!" board.

The first one I did was the Brown Sugar and Balsamic Glazed Pork Loin from the C+C Marriage Factory Blog. I linked the recipe to the name, so I won't re-post it here (I really hate typing recipes, so the less I need to do, the better).  :-)  It was delicious! The glaze is awesome, even if the pork loin ended up dry (my fault, not the recipe's).  Here's a picture of the finished product, with some roasted brussels sprouts and turnips (the glaze tasted great on those, too!):


The next recipe I attempted was the Pretzel Crusted Peanut Butter Cup Blondie Pie from the Cookies and Cups blog.  Again, this was a really great recipe, although, if I make it again, I might try it in a different pan. A 9x13, say, and increase the recipe accordingly, so I could cut it into squares.  No real reason, except the filling made a lot and almost flowed over my 10 inch tart pan, and taking the ring off the tart pan was really messy.  I'd definitely make sure my pretzels were more finely crushed. And I might try putting brown sugar in the crust, rather than granulated.  But the blondie filling was delicious! I'd bet it would be great on it's own, even without the crust.  Here's photographic evidence of my attempt:


I topped it with maple-walnut ice cream and chocolate syrup, taking a cue from the original post. Loved the combo of the maple-walnut ice cream with the chocolate chip/peanut butter cup filling. My family loved it.  Because I can't leave well-enough alone, next time I might try adding peanut butter to the blondie filling to increase the peanut butter-chocolate intensity (it's one of my favorite flavor combos!).  If anyone out there is inspired to try any of these changes before I get to it, please report back how it turns out!


Finally, the last pinned recipe I tried recently was the Garlicky Baked Shrimp from Real Simple. It was super simple (I just tossed everything around in the baking dish) and delicious!  I served it over red bell pepper rice (steamed some rice, then added butter and some chopped up red pepper right out of the microwave, then covered it back up to steam all together) and a delicious strawberry goat cheese salad that I found on Eating Well. Instead of the greens called for, I just used some mixed greens I already had on hand, and I substituted toasted almonds instead of the pecans, since I had some already toasted up (I'm all about the simple, baby!).  Here's what our dinner looked like:


The picture with the salad really doesn't do it justice. I'm really going to have to work on my photographic skills! With a glass of white wine, it was the perfect meal!

Saturday, April 14, 2012

Soup's On!


I love soup! It can be cozy and comforting, or elegant, or refreshing. If you’re interested in improving your cooking skills and don’t know where to start, soups incorporate a number of basic skills, and is relatively hard to really mess up.  Soups are easy to make for a crowd or for freezing meals for later in the week.  You can make soups with relatively few ingredients, most of which we all have on hand. Oh! And pretty economical, too, depending on your ingredients.

So, have I sold you yet?

It’s also easy for entertaining. Make a nice pot of soup, toss together a green salad, some tasty bread, and voilà! You have a great meal, with minimal last-minute preparation, that allows you, the host, to enjoy your guests without sweating a complicated multi-course meal. People will rave, and you can bask in the glow of their adoration.

Last year, during January, I had Soupapalooza, where each Sunday, I would make a big pot of soup and issue a general invitation to my friends in the neighborhood to come over, hang out, and eat some soup.  It was great!  To be honest, I got the idea from an article I read in Bon Appétit, so I can't claim credit for the original idea.

When I was growing up, my mom would make what us kids called her famous “3-day soup.” The type of soup varied, but she made a big pot that we would have to eat for lunch and dinner over the course of three days.  True story. You’d think that would turn me off from soup forever, but no.  Probably because there are endless variations to soup, so I don’t think I’ll ever get tired of it.

One of my favorite soups she made was Chicken and Wild Rice Soup. So, in honor of her (and the fact that I had some extra wild rice hanging around), that’s what I’m making.

Just in case you’re not sure what wild rice looks like, here’s a picture:


It has long, black grains, and takes a while longer to cook than regular white or brown rice. That plastic tub behind it is homemade chicken stock.  I’ll usually make that out of a leftover carcass after I’ve roasted a chicken, but there are a lot of good quality stocks and broths out there, so don’t feel you have to make your own.  I’ll save the roasting of chickens and corresponding making of stock for another post.

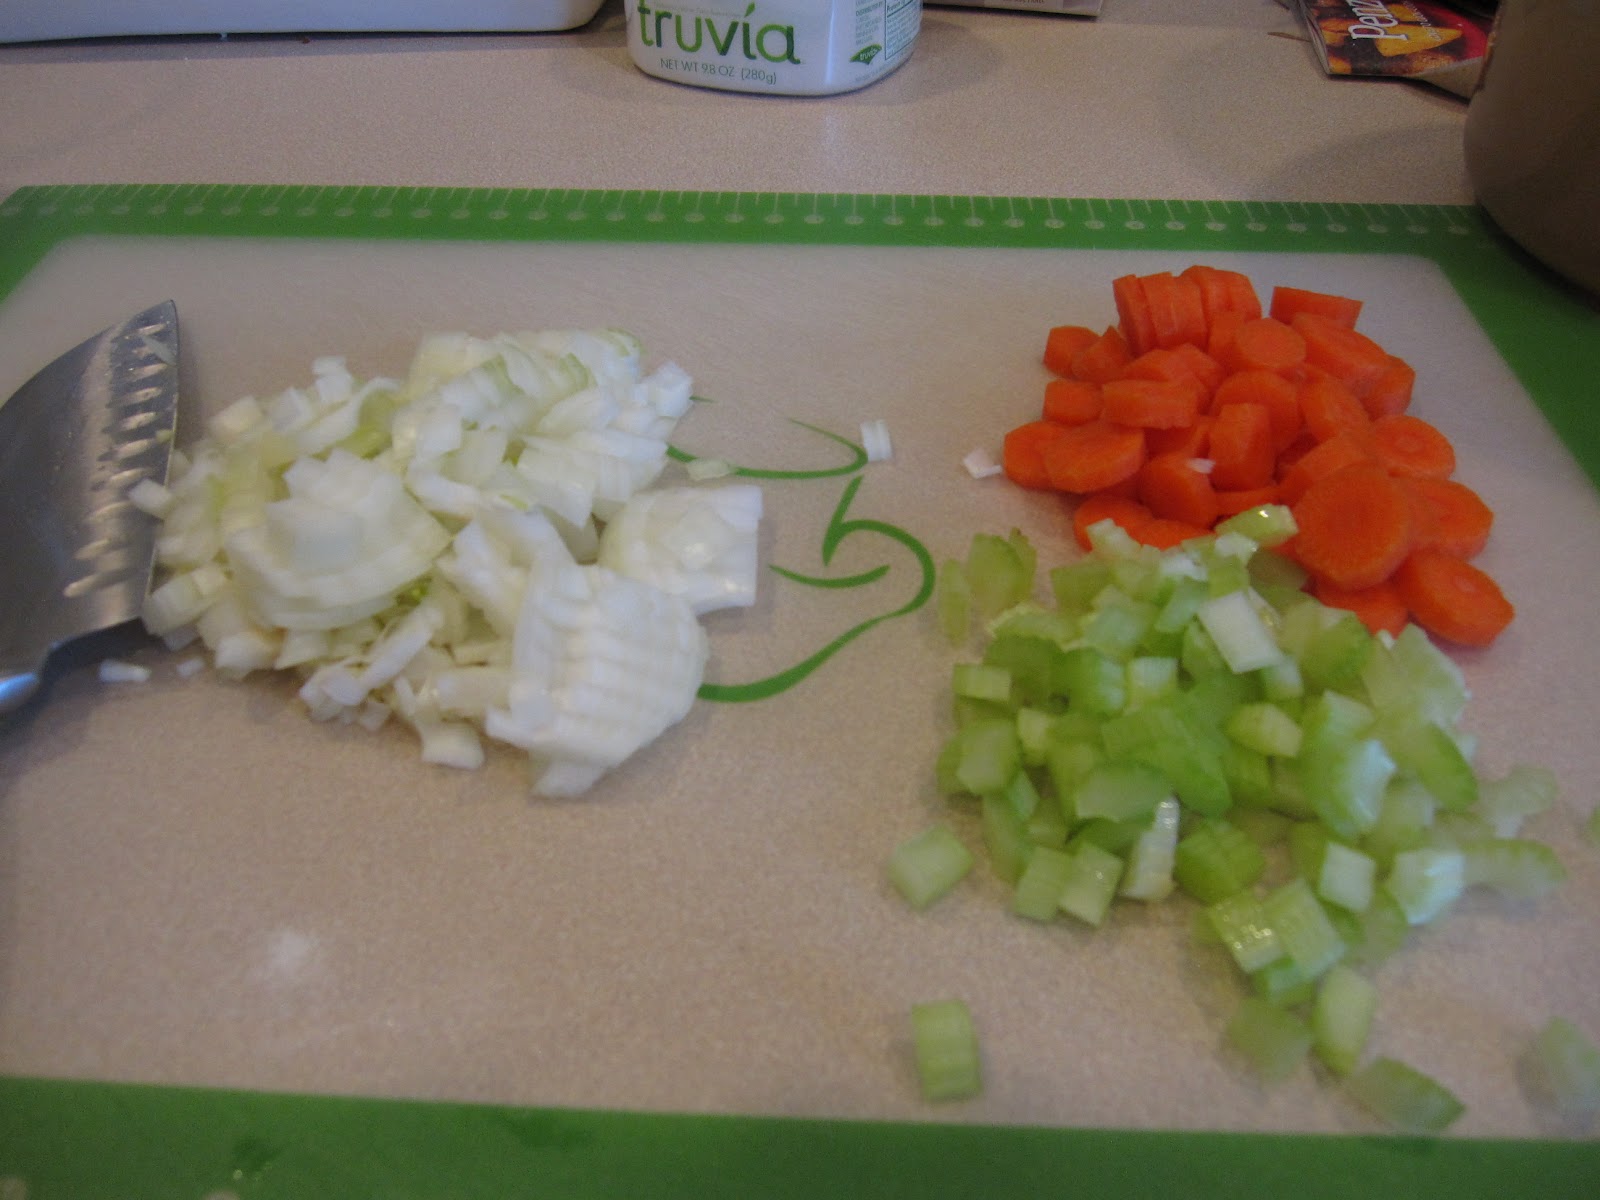
So, another important part of soup is making sure your veggies are chopped to relatively the same size bits so that they can cook at the same rate.  If you’re going to blend the soup later so that it’s smooth, the size of the veggies aren’t as important, but it’s still something to keep in mind.

Here are the components of the mirepoix (that’s a fancy term for chopped up celery, onion and carrots):


You may notice that the carrots seem to be in bigger chunks than the onions or celery. I did that because I like my carrots to have a little bit of bite to them, so I don’t want them as soft as the other veggies.

The other key part of a soup, one that elevates it from simply good to excellent, I think, is seasoning, which means actually tasting the soup.  It’s a tough job but someone has to do it.  Speaking of seasoning, I would be remiss if I didn’t give a shout out to Penzey’s Spices, my all-time favorite place to get spices. They have a store about 40 minutes from me, so I don’t go there often, but they also have a great mail order business. When I do make a special pilgrimage, I’ll spend an hour there, just smelling all the amazing spices and herbs, and usually spending a bundle!  (I swear I’m not a paid spokesperson, just a fan!) But I digress…

Okay, so after a few more steps like sautéing the veggies, dumping in the chicken stock and some water along with some chopped up cooked chicken and wild rice (I realize that other food blogs will have pictures of all these steps, but it's really just dumping the stuff into a pot and letting it cook, and you don't really need pictures of that, do you?), you’ll get something that looks like this:


It’s delicious and creamy, with big chunks of chicken and carrots. The wild rice gives it a little nutty earthiness.


Are you hungry?  Excellent!  Get cookin’!  Here’s the recipe:

Chicken and Wild Rice Soup

Ingredients:

1 Tbsp butter
1 onion, chopped
2 medium carrots, chopped
1 long stalk of celery, chopped
4 cups of chicken broth or stock
2 cups water
3 cups cooked chicken breast (about 2 breasts), shredded or chopped into bite-sized pieces
1 cup wild rice, cooked **
¼ cup butter (1/2 stick)
½ cup flour
1 ½ cups cream
a couple drops of sriracha hot sauce (a couple drops of Tabasco will do, too)
salt and pepper to taste

1.              Melt 1 Tbsp butter in  a large pot (at least a 4 or 5 quart soup pot) over medium heat, then add onion, carrots, and celery.  Saute (cook) for about 5 minutes, stirring occasionally to make sure the veggies don’t brown.
2.              Add stock, water, chicken and rice to the pot and bring to boil, then turn down to a simmer (the liquid should not be bubbling, but just shivering around a bit).  Simmer for 10 minutes.
3.              While the soup is simmering, you’re going to make a roux: in a separate, small (2 quart) saucepan, melt the ¼ cup butter over medium-low heat, then sprinkle the flour over the melted butter, whisking until it forms a smooth, pasty kind of mixture.  Let that cook, still whisking, for 2-3 minutes (you’re cooking out the flour taste), then add the cream and whisk like crazy until the flour/butter paste is completely incorporated into the cream.  Let this cook on low heat for 5 minutes, or until it’s thickened, stirring occasionally. (NOTE: you could skip this step all together, if you want a less thick soup, and just add the cream to the soup after it’s cooked the 10 minutes called for in step 2).
4.              Add the roux/cream mixture to the chicken/rice soup mixture and stir to incorporate all the ingredients.
5.              Season to taste with salt and pepper.  I also added a little Sriracha sauce to the soup, which gave it a subtle kick.  Be sure to taste the soup BEFORE you add any more seasoning – commercial stocks and broths can have a lot of salt already added to it, and if you used chicken from a store-bought roasted chicken, those tend to be salty, too.  So taste, then season, then taste again.

**Cook the wild rice according to package directions, or use leftover wild rice, if you have it. Essentially you should have 2 or 3 cups of cooked rice before you add it to the soup. If you’re making the rice from raw, then allow a good 45 minutes to cook it before you can add it to the soup.

This should serve 6-8 people, depending on how hungry they all are.   And it should take you 30 to 60 minutes to make.  Why the huge disparity? Depends on if your chicken and rice have already been cooked, and how long it takes you to chop stuff.

This recipe (as most soups) is really versatile. For instance, you could up the veggie to chicken ratio, or cut back on the rice.  If you have to cook your chicken, intensify your broth by poaching the chicken in it, then remove the chicken to slice it up (just make sure you boil the chicken stock after removing the cooked chicken for 10 minutes – doesn’t have to be a big, rolling boil, but you want to make sure you cook out any bacterial that the raw chicken might have had). You could throw in mushrooms or corn.  You could add a cup of white wine to the veggies and cook a bit before adding the stock..  Lots of variety.  Make it your own and have fun.  After all, that’s what cooking’s all about, right?