Sunday, November 19, 2017

Use it Up: Halloween Candy


Are any of you stuck with the last dregs of Halloween candy? Just us? My usual rule for the boys is anything that is left by Thanksgiving gets tossed. Most of it is usually smarties and lollipops, but I totally overbought this year and had a bunch of Milk Duds and Whoppers left over (because of course I already ate the Reese's peanut butter cups, Twix and KitKats). I like Whoppers, but they're pretty rich if you eat more than a couple at a time, and I'm always afraid that I'll lose a filling every time I eat a Milk Dud, so I was trying to figure out a way to use some of this stuff up. I was raised not to waste food, so it kills me to throw it away, even if it is candy.

So, I looked around for some inspiration on the internet and found it! Milk Dud brownies and Whopper Blondies! The Milk Dud Brownies are a little like something my Grandma used to make with melted caramels, chocolate chips and walnuts. If I tried this again, I might try to melt the Milk Duds and swirl it in the batter, but other than that, I think these turned out pretty well.

Just in time for Thanksgiving (you always need extra snacks and treats!), I wanted to share these quick and easy ways to use up some of your leftover candy:
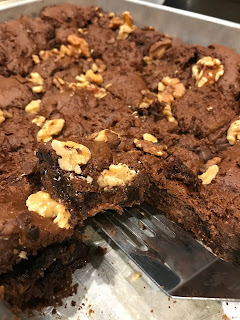


Milk Dud Cake Mix Bars (from Kleinworthco.com)

2 Devil's Food cake mixes
1 12 oz can of evaporated milk
2 cups Milk Duds
2 cups Chocolate Chips
1 cup chopped walnuts (optional)

  1. Preheat oven to 350 degrees & spray a 9x13 glass baking pan with cooking spray. Set aside.
  2. Mix cake mix, evaporated milk & melted butter in mixer beating well.
  3. Add 1 cup milk duds & chocolate chips & beat well.
  4. Transfer 3/4 of batter to prepared pan & spread out flat in bottom as best you can. It's very sticky.
  5. Bake 10 minutes - pull out.
  6. Top with remaining milk duds & chocolate chips and all of walnuts (if using)
  7. Drop remaining batter on top- do not spread out.
  8. Return to oven & bake another 40-45 minutes
  9. Check with toothpick test- should be mostly clean.
  10. Remove & allow to cool completely before cutting.
Store at room temperature in airtight container


Whopper Blondies (based on a recipe by Bobby Flay on the Food Network)


1 1/2 sticks butter, melted, plus more for greasing pan
1 cup all purpose flour
2 cups Whoppers, divided
1 tsp baking powder
1/2 tsp salt
1/2 cup light brown sugar
1/2 granulated sugar
2 large eggs
1 1/2 tsp vanilla extract

Preheat the oven to 350 degrees F. Butter and line a 9-by-9-by-2-inch baking pan with parchment paper, allowing a 2-inch overhang. Butter the lining, too.
Pulverize 1 cup of Whoppers, either in a food processor, blender, or using a rolling pin. Try to get it as fine as you can, but it's okay to have a few chunks in there. Whisk together the crushed Whoppers, flour, baking powder and salt in a medium bowl and set aside.
Combine melted butter, both sugars and whisk until combined and the sugar is melted, about 5 minutes. Whisk in the eggs and vanilla extract until combined. Add the flour mixture and whisk until just incorporated. Cut the remaining 1 cup of Whoppers in half (some smaller pieces will break off, but that's okay). Transfer the mixture to the prepared pan. 
Honestly, y'all, I thought it looked a little like vomit when I put the batter into the pan:


Sprinkle the halved Whoppers on top (this made it look less vomit-y):


Bake until the top cracks slightly and is firm to the touch and a skewer inserted into the center comes out with moist pieces clinging to it, 24 to 27 minutes. Remove to a wire rack and let cool completely. Remove the bars from the pan using the parchment handles, transfer to a cutting board and cut into 2-inch squares.


Thursday, October 12, 2017

Your Nachos Will Never Be the Same!


What could be better during football and hockey season that a big plate of nachos, amiright? Well, I do have something better, and you will be making it again and again, I promise!

It actually started with some leftover brisket from Monk's BBQ in Purcellville, VA. The best BBQ in the area, in my opinion. Actually, if you ever get out there, just get whatever is on their specials menu, otherwise you will have regret, because you won't be able to go back and get the thing again. Trust me, I know from experience.

Anyway, back to the leftovers. So I had a little of this, a little of that (including Monk's homemade pickles), so I thought, "Maybe I should make totchos with all of this stuff," you know, trying to stretch out what I could so that the whole family could have some. What are totchos, you ask? They are nachos, but made with tater tots. Yes, you read that right: Tater. Tots. I'll give you a moment to let that sink in...

So, I lined up my varied (some might say motley) items to turn into my bbq totchos:


I threw the tater tots in the oven to bake as directed on the package (I made the whole bag, natch). Once they had baked for half the time, I turned the tots, then scattered the chopped up brisket on top. while that finished, I chopped up the scallions, pickles and tomatoes (any kind will do - I just happened to have grape tomatoes to use up).

I also went fancy and made a cheese sauce:

1 Tbsp butter
1 Tbsp flour
1 cup of milk (approx.)
1 cup grated cheddar cheese (I used what I had on hand, so it ended up being a mix of white and sharp cheddar)
Salt and pepper to taste

Melt butter in a medium saucepan, then add flour and whisk until no lumps are in the flour and the mixture forms a smooth paste. Cook for a couple of minutes (set the timer for 2 minutes if you need to be precise, but it's just to cook the "flour-y" taste out), then slowly add the milk, whisking constantly. Keep whisking and cooking the white sauce until it is smooth and starts to bubble. Once it's thickened, whisk in the cheese and continue whisking until smooth. If the sauce is too thick, you can add a little bit more milk. If too thin, add more cheese. The sauce should be pourable, but not too runny (a little thicker than buttermilk pancake batter). Season with salt and pepper to taste.

OR, you can skip this step and just scatter shredded cheese on top of the brisket then put the sheet pan back in the oven. I made these both ways (cheese sauce vs. shredded cheese) and the boys liked both versions. I'm giving you the option. :-)

Once the tater tots are done, pull the sheet pan out of the oven, then pour cheese sauce over the top (if you didn't go the shredded cheese route), topped by the scallions, tomatoes and pickles. Those are the toppings I used, but feel free to be creative and share your favorite "totcho" toppings in the comments!


Serve and enjoy!  You might end up fighting over the last of the tots. Don't say I didn't warn you!

One final note: If you don't happen to have leftover BBQ, feel free to make your own in the slow cooker: Put a pork shoulder (pork butt) in the slow cooker (probably about 6 lbs, but it could be less, that's just what fits in my cooker), then top with your favorite bottle of BBQ sauce (16 oz). cover and cook on low for 8-10 hours, until it is pull-apart tender. Once you have this made, you can freeze leftovers (there will be a lot), or just make sure you have a plan for the week to use up the rest -- grain bowls, sandwiches, tacos, what have you.


Friday, September 1, 2017

Milk and Cookies


It is 1978. A nine-year-old girl takes out her key, opens the door, lets her little sister into the house, then follows. The house is quiet. The girl's brother had decided to stay outside and play with his friends, but the girl watches her little sister until her mom comes home from work in a couple of hours. Maybe she had watched too many "Leave it to Beaver" reruns or "Brady Bunch" episodes, but she felt a pang of regret that no one was at home, waiting for her with milk and cookies, ready to ask about her day. She didn't brood over it, but the thought stuck with her, resurfacing at random moments over the course of the next few years. She understood why her mom wasn't there. As a single mom raising three kids on a nurse's salary, she worked hard and long hours. It was just the way it had to be, and the little girl wasn't bitter, just wistful in a "wouldn't it be nice" kind of way. She vowed that if she could, she would have milk and cookies waiting for her kids.

Fast forward to last week, when my kids started back to school.  I have been a stay at home mom for several years (save for part-time jobs that allow me to be home when the kids walk in the door), and I don't always have cookies and milk waiting for them, but last week that memory from decades ago returned, and it inspired me to make some cookies that first day of school. I am sure my kids didn't see much significance in it (I bake stuff all the time), but it was more for me and that little girl back in '78. Being able to be at home, having cookies fresh from the oven and ice cold milk for my boys, sitting down to ask about their teachers, with whom they walked to school, homework. I didn't really have these conversations with my mom. That's ok; my mom is awesome in so many other ways! Some may think that's a humble dream, to be home to give milk and cookies to my kids, but I am so grateful that I am able to have this opportunity, and some day, I hope my boys will come to appreciate it as well. Maybe they'll appreciate the sacrifices my husband and I made in order to have one of us stay home, but we felt that this was the best thing for us, and fortunately we were in the position to have a choice. Not everyone does.

Maybe I'm starting to realize that, at 15 and 13, my boys aren't going to want to spend this time with me as much anymore. Even dinner time, which I have tried to hold sacred as family time to connect, is starting to slip through the cracks as one kid runs off to soccer practice with the other parent some nights or the older one made plans to meet his friends at the football game. I'm not sure there's much more of a point to my post this time, except to encourage every parent to take a little time, maybe not every day but consciously put aside a few moments, to sit and ask questions and then really listen to your kids' answers. And it doesn't even need to be over some milk and cookies! :-)

Feel free to share in the comments section ways you try to connect with your kids!

Classic Toll House Chocolate Chip Cookies

(from the Epicurious website, because the Nestle website was taking forever to load)


INGREDIENTS

    • 2 1/4 cups all-purpose flour
    • 1 teaspoon baking soda
    • 1 teaspoon salt
    • 1 cup (2 sticks) butter, softened (Marna's note: I often use 1/2 vegetable shortening, 1/2 butter for softer, less crispy cookies)
    • 3/4 cup granulated sugar
    • 3/4 cup packed brown sugar
    • 1 teaspoon vanilla extract
    • 2 large eggs
    • 2 cups NestlĂ© Toll House Semi-Sweet Chocolate Morsels
    • 1 cup chopped nuts (Marna's note: I omitted them this time, but I especially like black walnuts if you can find them)

PREPARATION

    1. Preheat oven to 375°F.
    2. Combine flour, baking soda, and salt in small bowl. Beat butter, granulated sugar, brown sugar, and vanilla extract in large mixer bowl until creamy. Add eggs, one at a time, beating well after each addition. Gradually beat in flour mixture. Stir in morsels and nuts. Drop by rounded tablespoon onto ungreased baking sheets.
    3. Bake for 9 to 11 minutes or until golden brown. Cool on baking sheets for 2 minutes; remove to wire racks to cool completely.
  1. Pan Cookie Variation
    1. Preheat oven to 350° F. Grease 15 x 10-inch jelly-roll pan. Prepare dough as above. Spread into prepared pan. Bake for 20 to 25 minutes or until golden brown. Cool in pan on wire rack. Makes 4 dozen bars.
  2. Slice and Bake Cookie Variation
    1. Prepare dough as above. Divide in half; wrap in waxed paper. Refrigerate for 1 hour or until firm. Shape each half into 15-inch log; wrap in wax paper. Refrigerate for 30 minutes.
    2. Preheat oven to 375° F. Cut into 1/2-inch-thick slices; place on ungreased baking sheets. Bake for 8 to 10 minutes or until golden brown. Cool on baking sheets for 2 minutes; remove to wire racks to cool completely. Makes about 5 dozen cookies.
  3. Do Ahead
    1. Dough may be stored in refrigerator for up to 1 week or in freezer for up to 8 weeks.
    2. Marna's note: I will scoop out dough into cookie portions, freeze on a baking sheet for an hour or two, then put the frozen balls of cookie dough in a freezer bag to store. That way, you can take out just a few to have fresh-baked cookies in just a few minutes with no big mess! Here's how to bake them: take the number of dough balls you want to bake from the freezer, place on a parchment or lined cookie sheet, then put in a cold oven. Turn oven on to 350 degrees (F) and bake for about 15 minutes (if you like them crispier or more golden brown, you might need to bake for a little longer). Hint: on the outside of the freezer bag where you stored the frozen cookie dough balls, write the baking instructions on a piece of masking tape and stick it to the freezer bag.
    1. This recipe is made available as a courtesy by Nestle USA and www.VeryBestBaking.com. Nestle® Toll House® is a registered trademark of SociĂ©tĂ© des Produits NestlĂ© S.A., Vevey, Switzerland.

Sunday, July 30, 2017

Peanut Butter Chocolate Bliss!


Ever since the Reese's commercial that said "Hey! You got peanut butter in my chocolate," I've been a huge fan of that flavor combination. Luckily, my oldest son loves the combo almost as much as I do, so when I showed him a picture of a peanut butter ice cream cake, he wanted nothing else but that for his birthday. 

The Today Show posted the recipe that Carson Daly's wife made for him for his birthday. Here's her version:


After reading the recipes, though, I tweaked it a little to get even more peanut flavor in there, and a little more texture by adding some chopped peanuts.  I also thought the ganache would be too hard once it was refrigerated again, and I want the gooey, almost ice cream sundae experience, so I switched the ganache for hot fudge sauce and added some of it in the middle of the cake as well. The following is my take on Siri Daly's original:

Ingredients:

  • 1 package Oreos (I used peanut butter filled Oreos, because of course!)
  • 6 tablespoons butter, melted
  • 2 pints chocolate peanut butter ice cream (I used Talenti brand - the only chocolate-peanut butter ice cream I could find at the store), softened
  • 1 pint vanilla ice cream, softened (you can let this soften in the fridge while the chocolate ice cream layer is in the freezer)
  • 1 bag Mini Reese's Peanut Butter Cups, chopped and divided (I probably used 2.5 cups total, chopped)
  • 2 - 11 oz jars of hot fudge sauce
  • 1.5 cups roasted, unsalted peanuts
  • 1/2 cup natural peanut butter
To make the cake:
1. Butter a 10-inch springform pan (preferably one that is 3 inches deep), bottom and sides. 
2. In a food processor process Oreos until finely crushed.  With processor running, pour melted butter into the crumbs and process (you will need to stop and scrape the bowl at least once). Pulse a couple of times to get the crumb mixture to a wet sand consistency that stays together when you pinch it. Using a rubber spatula (or your hands, the bottom of a metal measuring cup works well, too), place mixture into prepared pan and evenly press over the bottom and up the sides of the pan. Place in freezer for about 10 minutes.
3. Scoop out the chocolate peanut butter ice cream into the cake pan and evenly spread. Pour about one jar of fudge sauce (you might have to warm up a little to get it to a pourable consistency). Sprinkle about half of the chopped peanut butter cups and about peanuts on top (enough to get an even layer over the fudge sauce. Freeze for one hour.  
4. Scoop out the vanilla ice cream on top of the peanut butter cups and evenly spread. Freeze for one hour.
Here's a pic just before I spread the vanilla ice cream:


Note: Steps 1 through 4 can be made a day or two in advance
5. About 15 minutes before you want to serve the cake, pull cake out of the freezer and put in the refrigerator to soften slightly.  This is what it will look like when you take it out of the freezer. Kind of boring, yes, but this is when the magic starts!
6. Just before serving, take cake out, run a thin knife between the crust and the pan side to loosen it, then pull the side of the pan away from the bottom. put the cake on serving plate. Drizzle the second jar of fudge sauce on top of the cake, letting it pour down the sides. Sprinkle with the rest of the chopped peanut butter cups and peanuts. 
7. Microwave the peanut butter in a small bowl until it is pourable. Pour over the top of the cake.  Here's what the finished product looked like: 

8. Serve. If you're having a bit of an issue cutting through, run your knife under hot water dry it, then try again. We also served with whipped cream, so you could do that, too. It's gilding the lily a little bit, but oh so good!


It was a huge hit! And ice cream cakes are so easy (you just need some patience with the softening and freezing), that this is a perfect summer treat!

Monday, June 26, 2017

My week at the CIA!


No, not THAT one. I went to the other one, better known as the Culinary Institute of America. I turn 50 next month, and for my birthday, my husband surprised me with a trip to California to attend a week-long boot camp at the CIA's Greystone facility in St. Helena, California. The "Best Of" Boot Camp takes all of their most popular boot camps and rolls them into one. So, instead of doing 5 days of knife skills and fundamentals, we did that one one day. Same with Italian food, Asian, French and baking. It was kind of a whirlwind, but a lot of fun.

Here's a view of the Greystone campus from across the street at the Charles Krug winery:


I was staying with my cousins, so I had to drive between Sonoma and Napa counties every day. Rough, I know. These are photos from my drive (kind of tricky to get good pics, because of windy, narrow roads, but trust me, the views were lovely!):


Generally what happens each day is that we would gather for lecture at 2pm. After lecture and demonstration, we would go into the kitchen. My class was pretty small -- 11 people -- so we were assigned to a team of 3 with one team of two that switched each day, and each team was assigned a menu, usually 3 items, to make. We tried to get our stuff all done by 8, but sometimes, especially if we took longer in lecture than usual, we went even later. After we cooked, we ate, so most nights I didn't get out of class until around 9pm.

This is my plate from the first night, which was knife skills and fundamentals. Even though I've cooked most of my life, I learned the proper way to hold a knife (higher up on the handle than I thought) and how to cut onions without crying (a sharp knife and slicing through with a back and forth motion, not just straight down). I also got to practice my piping skills with the potatoes duchesse. It was a lot of piping, so my teammates and I shared the work! We got into the kitchen pretty late, so the roast I was supposed to make didn't make it in the rotation that night (we saved it to make another night).


The next day we did Italian. It was neat because I got to work with an ingredient I'd never used before: caul fat. Interesting stuff, for sure! I used it to wrap around the stuffed pork roast. I also learned how to tie a roast properly! My teammate and I (we were a team of two that night) made the roast, gnocchi and stuffed zucchini. Here is our presentation plate:


The bolognese sauce (pictured below on the left) was fantastic! On the right is our full platter of the stuffed zucchini.


My plate for dinner that night. I tried to be conservative in my portions. It was still a lot of food!


Wednesday, we got to class early to take a tour of the whole Greystone campus. The CIA had bought the property from Christian Brothers winery, and you could see that heritage in the top floor, where they still kept some of the wine barrels:


They even have an outdoor oven for students to practice those kinds of skills.


Chef's crossing!


This is the classroom where they teach wine tasting, complete with spit sinks and lights to get a good look at a wine's color. Being in wine country, they have a pretty extensive class offering for wine tasting. Also, we were told on the tour that CIA students at the other campuses are sent here if they want to have a more in-depth background in wine.


This the view from the wine tasting classroom. I would find it hard to concentrate!


Views of the main building:


The foyer of the main building:


This is the Gatehouse, the on-site restaurant run by the CIA students:


Asia night was fun as well. My team made a curry, summer rolls, and crispy Saigon pancakes. In addition to the curry and coconut rice (so good), I worked on the plating for our team. :-)


The other dishes were really delicious! Potstickers, a pork stew and a papaya salad.


These were the presentation plates from all the teams:


That night, we got a bonus chocolate tasting from the chocolatier in charge of the chocolate classes at Greystone. That night, his class worked on single-sourced chocolate. We tasted 3 different chocolates from 3 different areas, and it was amazing how different the chocolates could taste. It was as delicious as it was interesting!


This is me in my chef's get up, which all of us were required to wear. Two sets were given to us as boot camp participants. Even at extra small, the pants were still amazingly long, yet uncomfortably tight at the waist (odd sizing all around).


I think baking day was my favorite. I was excited to be on the team that got to make profiteroles (cream puffs filled with ice cream and topped with chocolate sauce).  My mom made these when I was a kid at home, but I never made them myself, and my youngest loves cream puffs and eclairs, so I really wanted to do this one. :-)


Each team made a bread -- they look so great (I forgot to get a pic of the focaccia)!


Here are all the baked goods. Each team did a bread, a cookie and a dessert item.


Friday, our last day of class, we also got a lunch. We got to sit in the board room, and the food was super!


The salad with tomatoes and burrata (the first time I'd tried it) was fantastic!


Salmon with fried squash blossoms. I forgot to mention that they have their own gardens there, where some of their vegetables and all of their herbs come from.


Dessert was delicious, too. Loved that swipe of lemon curd to cut the richness of the creme fraiche.


Our last night of cooking was all about French bistro. I got to do the quiche, which was exciting, because I could work with pastry dough. Even though I didn't make the dough (I have to practice that, for sure), I did finally get advice on how to keep my crust from sliding off the sides when I do a blind bake. The key (which I didn't know) is to pack the crust with beans all the way up the sides, not just put them on the bottom. Then bake for a few minutes until the edges get dry-looking, then pull out the beans and parchment paper then bake some more so that the bottom can start to bake. It was great! I also got to practice my caramelized onions, which always take longer than I think they're going to. This night I had the time to really get them done. Below is the caramelized onion, smoked salmon quiche. I'm kind of proud of it!


More of the offerings that night, including Croque Monsieur and a hazelnut-crusted camembert with apple chutney. They were all so good!


Me with our instructor for the week:


Me with the pastry chef (on the left) and our instructor. They were fantastic!


It was such a great week! If you are in a position to do this (they offer 2-, 4-, and 5-day classes), I highly recommend it! It was kind of nice to putter in the kitchen (even if we did have time constraints) without having to worry about doing the dishes (yay!). It was also kind of cool to work on commercial equipment, which actually is different from working in the home. I met some great people along the way, too. Folks from all walks of life, younger (we had a recent college grad) to a little bit older than I, folks who mostly microwaved meals and didn't like cooked vegetables to food professionals. And the nicest thing was that we all got along really well, no drama or frustration, regardless of who was on what team for the night. A big thanks to my hubby for splurging on me and knowing exactly what would be a big treat! Now, I have to start planning something good for HIS 50th. Luckily I have a couple of years to figure it out...

Cheers!