Monday, February 25, 2013

Frankenstein's Monster Cookies


Monster cookies with dark chocolate chips, smoked peanuts, bacon bits, and bacon meringue crumbles.  Crazy?  Not until you taste them!  So, you know from my earlier post that I had some left over bacon meringue crumbles (crumbs, whatever).  I put a lot of sweat and tears into those babies, so I wasn't about to just throw them out!  It just so happened that I had a jar of peanut butter that my kids didn't like so much (the texture wasn't smooth enough), so I was thinking monster cookies.  Also, I didn't have enough peanut butter, so I added a little bit of this chocolate almond spread I picked up at Trader Joe's.  Don't be fooled: it's not Nutella.  I don't prefer the flavor as much, so I'll be using it up in some baked goods or maybe a frosting in the coming months....but I digress.  Because the peanut butter I was using was natural, which tends to be oilier and looser than more processed peanut butters, I did add a little bit of flour, so you may quibble that this is not a true monster cookie.  But you can get over all of that, especially when you take a bite of these bad boys.

Now, if you don't have bacon meringue crumbles, by all means, just use bacon bits and call it a day. I happened to have both, so I put both in.  No sense in doing things half-assed, am I right?  Also, you can leave the nuts out if you want, or just use regular peanuts or almonds.  I happened to have some smoked peanuts (which I mixed with plain roasted almonds) that I wanted to use up as well (are you sensing a theme??), so in the dough they went!  But really and truly, these were tasty!  Chewy, with a sweet/savory/salty thing going on that was heaven!

If you've never made monster cookies before, the real key is to not overbake them.  They will look a little under done when you pull them out, and it's essential to let them sit on the baking sheet about 5 minutes before you take them off.  Honest. Then you take them off the cookie sheet and let them cool all the way on a cooling rack.


This is what it looks like when you combine the eggs and sugars.  It's very loose, but just wait, things will tighten up when you add the peanut butter:


And after you add all of the dry ingredients, the cookie dough becomes really stiff.  I had to sort of knead in the chips, nuts, and bacon bits.  This is what the finished dough looks like:


Here's a shot of the finished product while they are still cooling on the sheet pans.  You will definitely need to line the pans with a silicone mat or parchment paper.


Frankenstein's Monster Cookies

4 eggs
1 1/4 granulated sugar
1 1/2 cups brown sugar
3/4 tsp salt
1 tsp vanilla
12 oz natural peanut butter
3 oz. Trader Joe's cocoa almond spread
1/2 cup (1 stick) butter, room temperature
3.5 cups oats, not instant
2/3 cup flour
2.5 tsp baking soda
1 cup chopped smoked almonds and/or peanuts
1 cup dark chocolate chips
1/2 cup bacon bits (or 1/2 cup bacon meringue crumbs)

Beat sugars and eggs together thoroughly.  Add butter, salt, vanilla, peanut butter and cocoa spread.  Cream all together. Add flour and baking soda. Mix until combined, then stir in nuts, chocolate chips and bacon.  Dough will be stiff.

Drop by rounded tablespoons onto parchment-lined large baking sheets. Flatten each cooking down slightly. Leave 2 inches of space, because they will spread a bit. I could only fit about 10 on a large sheet pan.

Bake 10-12 minutes at 350.  The cookies should still look a little puffy and only lightly browned when you take them out. Let them cool on the pan for at least 5 minutes before taking them off the baking sheet and finishing cooling on a cooling rack. You do not want to overbake these cookies so that they'll stay chewy and delicious.

Makes a lot -- 4 dozen or so.

Saturday, February 16, 2013

Meat Day

Yes, you read that right. Some people celebrate the Super Bowl, but in my neighborhood we celebrate meat in all its forms (and in some forms you never would have thought existed) on the day of the Super Bowl.  It all started a few years back when our neighbors hosted a tail gate party in the alley.  For a couple of years, it was kind of normal, with chili, ribs, burgers and such.  But then, someone (I won't name names) brought a bacon log, then all bets were off.  After that, the meat-inspired creations took off, with more variations of the bacon log, bacon rose bouquets (I'm not kidding -- Slim Jim stems and basil leaves), buffalo chicken dip, hog wings (da bomb!!), maple bacon cupcakes, buffalo chicken cupcakes (both of those were my contributions).  This year, a good friend asked me to collaborate with him.  He wanted to do some sort of bacon ice cream.  His first thought was to do a pineapple-bacon combo, but he couldn't find pineapple ice cream, so he had do settle for salted caramel.  He asked me to figure out a bacon cone to go with it.

This is where it started to get real, people.  I tried tuiles and florentines, with bacon added. Neither of those attempts worked out quite right.  So I thought, "What about meringue cups?" I was worried about the greasiness of the bacon not working with the meringues, but it actually did work.  The main thing is to cook the bacon until it's really crispy and blot out as much of the grease as possible before chopping it up.


From this photo, you can see how well-cooked the bacon was. After I cooked it, I drained it on paper towels, chopped it, then put it on paper towels again and pushed out as much of the grease as I could.


Anyway, I first tried it using maple sugar.  It tasted great, but when Matt said he was going to use salted caramel ice cream, I had to switch course, because the maple sugar gave it a toasted brown color and beige + beige = unappealing visuals. Remember, we eat with our eyes first.  So, I went back to a traditional meringue recipe using regular, granulated sugar.  These turned out great, except for them sticking to the pan I used.  Trying to make a nicer cup shape, I turned my mini-cupcake pan over and used that as a form.  Unfortunately, the bottom side of the pan isn't non-stick like the inside (it was Pampered Chef, so I thought it was coated all around).  So, version number two turned into bacon meringue crumbles.

The third try, I wasn't taking any chances.  Piped circles on parchment paper it is! I made them small, about 2 inches in diameter, to be eaten in a bite or two.  When you're tailgating, you do not want to mess with a lot of eating utensils.  To scoop the froyo into the cups, I used my smallest cookie scoop (1.5 inch diameter), which was perfect.

Here's the final result:


Why yes, that IS crumbled bacon on top.  Crazy, you say?  Crazy Delicious!  They were a big hit, but unfortunately I only had about 2 dozen of the little meringue cups.  I had actually made three batches of the dang things (as noted above), but by the time I got everything right, I was so tired of making meringues (and has so many egg yolks to figure out what to do with), I was just done.  I try to do something different each year, but these bad boys might have to make another appearance, just so more people can have a taste.


Bacon Meringue Cups Filled with Salted Caramel Frozen Yogurt

3 egg whites, room temperature
3/4 cup granulated sugar (if you happen to have super-fine granulated sugar, use that, but the regular stuff will work, too)
1/2 cup bacon, cooked crispy, drained well of grease, cooled, and chopped very fine
2 pints salted caramel frozen yogurt or ice cream
extra bacon bits (optional)

Pre-heat oven to 175 degrees (F). Line 2 large baking sheets (11x17 inches) with parchment.  On the parchment, draw 2-inch diameter circles. Turn parchment over so the pencil marks are face down (you should still be able to see them through the paper).

Beat the egg whites until soft peaks form (about 2 minutes on high speed).  Gradually start adding the sugar, about 2 teaspoons at a time, letting the sugar mix in before you add more.  This should take about 2 more minutes.  Beat whites about another minute until the meringue is glossy and holds stiff peaks.


Gently fold in the bacon bits.


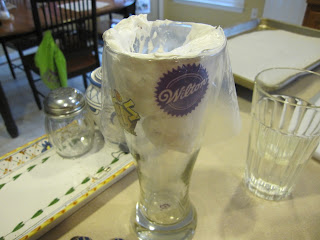
Put the meringue into a piping bag.  Tip: I stand my bag up in a tall glass and fold the top part over (see photo). It makes it a lot easier to fill the bag.  You can use an actual tip, but I just used a disposable bag and snipped off the end about an inch up from the bottom.


Starting in the middle of a circle, pipe a spiral out to the edge of the circle, then build up the sides (piping about 2 other circles on top) to form a bowl.  Repeat for the other circles.

Place baking sheets in the preheated oven and bake meringues for 2 hours.  They should be dry to the touch on the outside, but not browned.  Turn off oven and leave the meringues in the oven for another hour.

Remove the sheets from the oven.  The meringues should feel dry and hard, and they should peel easily off of the parchment.  If they aren't dry, then turn the oven on again to the lowest setting (on my oven that was 170 degrees F), return the meringues to the oven and let them sit in there for another 30 minutes, then turn the oven off.  Keep them in the oven with the door closed for another thirty minutes. They can be stored at room temperature in an airtight container for one day, but you should really finish them off after that, because of the bacon.  :-)

To serve, fill each meringue cup with one scoop of frozen yogurt, then top with more bacon crumbles, if you like.  You can make the cups ahead of time, and you can scoop out the ice cream ahead of time, but you can only put this together just before serving, otherwise the meringues will get soggy.

Makes 2 dozen.

P.S. As a variation, you could just drop these by teaspoons and bake them as meringue cookies, maybe even sandwiching them in between with some melted dark chocolate.  With the failed meringues (the ones that got stuck on the muffin pan), I stirred them into brownies (with chocolate chips and marshmallows), crumbled them on top of an ice cream sundae, and made Frankenstein's Monster Cookies (peanut butter oatmeal cookies with smoked peanuts and almonds, dark chocolate chips and bacon meringue crumbles).  More about those later.  :-)


Thursday, February 14, 2013

Bonus Valentine's Day Post!

Hi All!

This is going to be a quick post, because you will get another one soon.  I'm not making any promises, but maybe Friday or Saturday.

Anyway, today was Valentine's Day, which, to be honest, is not my favorite holiday.  So much hooplah over something you should show people all the other 364 days of the year.  Am I right?  And don't get me started on the overpriced dinners out (only went out to a restaurant once on Valentine's Day, and I'll never do it again).

So, I was rummaging around in my Valentine's holiday box and found a couple of heart-shaped pancake molds that I bought (probably on sale) at some point in the past.  Let me point out that the only reason I have a Valentine's box of stuff is because I have kids in elementary school.  I buy valentines and such on sale the day after the holiday to stock up on class party stuff.  So I am NOT being inconsistent.  Thanks.  I felt I had to set the record straight.

So, when I saw the pancake molds, I thought I would do pancakes for dinner, since we hadn't done that in a while.  Super fun, right? Wrong. Those molds were a pain in the butt to use.  It probably would have been easier to put the pancake batter in a squirt bottle and just squirt the shape onto the griddle.  Lesson learned.

But, they were still tasty, and I made a strawberry syrup to go with them.  No recipes tonight (otherwise, it will turn into a day-after-Valentine's-Day post), but if you want me to post either the pancake recipe or strawberry syrup recipe, leave a comment, and I do a longer post later.  :-)


Friday, February 8, 2013

Lemon Coconut Macaroons


When I first moved to Washington, DC, I lived near Dupont Circle and a great bakery/food store called Marvelous Market.  They had the most wonderful (marvelous!) chocolate-dipped coconut macaroons.  They were huge, and a true indulgence, but those cookies started my love affair with macaroons.

Please note that there is a difference between macaroons and macarons. It's kind of a pet peeve of mine when people use those terms interchangeably.  They are two different kinds of cookie/pastry. Macaroons do not have a filling, are generally made with coconut or almonds/nuts as its base, and sometimes you don't even whip the egg whites before adding the sugar and coconut or almonds. Macarons are little meringue-like confections (they look kind of like buttons) filled with ganache, jam or buttercream. They are often tinted with food coloring to make festive colors and can have seemingly limitless kinds of flavor combinations. 


Because they don't contain flour (or dairy, for that matter), macaroons are often served as a treat during the Jewish observance of PassoverMy husband and I were going to someone's house for Passover dinner a few years back, and I had offered to bring dessert, so I thought it would be fun to bring macaroons.  Jonathan was horrified, because he hated macaroons. No offense to Jews everywhere, but the macaroons you buy in the cans don't even begin to compare to homemade.  My husband, who is Jewish, had never tasted a homemade macaroon until I (a Lutheran) made one for him. I find it a little sad that he missed out on those tasty treats for so many years!

Anyway, macaroons are great to make when you have some extra egg whites left over.  I also like to make meringues, but I'll save that for a different post.  :-)  But the real reason I thought I'd make some macaroons is that I had a half of a jar of lemon curd in the fridge, plus the egg whites.  I saw a recipe for macaroons that seemed a little like a macaron, but not as labor intensive, so I thought I would give it a try, using the lemon curd for a filling.  Of course, I didn't follow the recipe as written.  Instead of making a true meringue,where you add the sugar gradually to get stiff, pillowy fluff, I dumped the sugar in all at once.  This deflated the egg whites a bit, but that's what I was looking for -- I wanted the end result to be a little crisp on the outside, but chewy on the inside.  I also like the flavor combination of coconut and lemon, so I decreased the almond meal a little, and added the unsweetened coconut.

The result was very much what I had been looking for: a light but chewy cookie.  What didn't work as well was the lemon curd filling, because the cookies were too chewy; when you tried to bite through the cookie, the lemon filling kind of oozed out the sides. It was kind of a mess.  BUT, the cookies themselves were delightful with a great lemon coconut flavor and just a hint of almond.  Even the kids at the bus stop liked them (well, most of them, anyway).


Lemon Coconut Macaroons (inspired by a recipe I found on Epicurious)


3 large egg whites (room temperature)
1 cup of sugar
zest of one lemon
3/4 cup almond meal
1/2 cup unsweetened coconut (I used flaked, but you could surely use shredded)


Preheat oven to  275°F. In an electric mixer, beat the egg whites until they form soft peaks (1).  Add the sugar and beat until the whites are shiny and airy, but will fall off the whisk in a thick ribbon (2). Fold in the ground almonds, lemon zest and coconut.


(1)


(2)


Line baking sheets with parchment paper. Drop heaping tablespoons of batter  onto the baking sheet. I used a cookie scoop, but you could also use two spoons to scoop, then scrape onto the sheet. Place the cookies 1 inch apart (they won't spread much when they bake). Repeat with the rest of the dough.


Bake for 20 to 30 minutes or until the cookies are firm and very slightly brown. Let cool for 5 to 10 minutes before removing the cookies from the baking sheets to a rack. When cool, store in an air-tight container. Makes about 30 cookies.


P.S. I am working on a post about our street's annual Meat Day, but I haven't loaded up the pictures.  I realized it's been a while since my last post, so this one will have to do until next week...