Sunday, February 16, 2014

Snow Day Shenanigans

Who's a little tired of winter?  <raising my hand enthusiastically>

Here in Virginia, we got a big snow storm that cancelled classes Thursday and Friday, and with President's Day on Monday, that means the kids have been home for 5 straight days in Loudoun County. We've already had 11 snow days, and frankly, I'm done with all of it.  Fortunately for me, my kids are old enough to get their snow gear on and play outside with their friends without my direct supervision, so I had some extra time the past few days. The majority of that time has been watching the Olympics, I won't lie, but I managed to get a few more things done.

After making snowmen pancakes for breakfast (nothing fancy, folks, just three small, connected blobs of pancake batter with chocolate chips for eyes and buttons), the kids went outside and I started making this:


I had seen this recipe for chocolate swirl bread and thought is looked so good! It's from the Woman's Day January 2014 issue.  While none of the steps are really difficult, it is a little fussy.  The results were so good, though, I would definitely make it again, but doubling the recipe.  I figure, if I'm going to go through all that work, I might as well get two loaves out of it, because the first loaf will be gone in minutes!

Even though it's a yeast dough, I found it really easy to work with.  Maybe it's the eggs that are in it. When you first turn the dough out, it will look a little shaggy:


But it only takes a couple of kneads to get it nice and smooth:


See what I mean about being easy to work with? It rolls out beautifully!


The chocolate filling is also easy, basically just melting all the ingredients together and stirring until smooth.  If you are not familiar with the spreading tool in the picture below, it's an offset spatula.  If you are spreading anything -- cake batter, bars, icing, fillings -- you really need one of these!  It works so much better for getting everything smooth and even than using a regular flat knife or spatula.  This particular one is from Pampered Chef (the one pictured is the large one. I also have the small spreader). 


Rolling the dough is always my downfall -- I never think I get the roll tight enough.


Making the "braid." Don't worry -- it's not complicated, more of a twist than an actual braid.


Popping it in the parchment-lined pan:


Clearly, I could have done better at forming the dough...

Making the crumb topping, I went old-school, using two knives to cut the butter into crumbs.  When I make this again, I'm going to use the food processor.  So much easier and faster!

Before:


After:


You pat in the crumbs before you put the bread in the oven. Here's the finished product:


It's a beautiful bread, worthy of gift-giving, I think. And, as I mentioned before, none of the steps are hard. Don't you want to have some of this??  So, so yummy!


Wednesday, February 5, 2014

Unexpected Ooey, Gooey Caramel Rolls


I love sweet rolls: caramel rolls, cinnamon rolls, whatever.  But most of the time I don't have time to mess with yeast, waiting for the dough to rise, etc. So I was looking for a faster, easier cinnamon roll recipe, when I came across something that sounded pretty good at the blog Iowa Girl Eats (if you've never read her blog, I highly recommend it).  But remember that I had that sweet potato caramel from the experiment last time?  I did, and had to figure out what to do with it, since it's been sitting on my counter for 2 weeks.  So the gears in the brain started grinding away and I thought, "Why not a sweet potato caramel roll?"  The addition of sweet potato is the "unexpected" part. :-)

Now, I am under no illusions that what I came up with is much healthier than any other sweet roll out there, but I did try to cut down the refined sugar, and I thought that adding the sweet potato, using some whole wheat flour, cutting the butter a teensy bit and taking out a little of the salt might help just a bit.

Y'all, they were really good! Which, of course, is why I'm sharing with you, because I wouldn't waste your time with crap.  :-)  I know there are a few steps, but none are very hard, and even the mixing is pretty straight forward.  Give it a try and let me know what you think!

Preparing the pan with the nuts and caramel topping:


Getting on with mashing up the cooked sweet potato. The heat from the potato will melt the butter:


After adding the flour, you'll get something like this:


Don't worry if it's not really well mixed. You'll knead that together so it gets nice and smooth.

Rolling out the dough is not an exact science...


On goes the yummy cinnamon filling:


Rolled and sliced, then placed in the prepared pan.  See my little wonky one in the bottom right corner? We never leave a man behind, even if it's the sad looking end pieces.  See that bench scraper in the picture on the left? It helps a lot for baking: I used it to help roll the dough (loosen parts that might be sticking to the sheet) and cutting the roll into pieces.


Puffed and ready to take out of the pan.  Looks like I could have brushed off some of the flour, though...


They need to rest, and let that gooey caramel goodness drip down onto the top.


 Voila! Sort of healthy-ish but super delicious caramel rolls!


 Unexpected Ooey, Gooey Caramel Rolls:

(Inspired by this recipe on Iowa Girl Eats)


For the Dough:

about 1 cup mashed sweet potato (or take a small sweet potato, pierce and microwave on high for 7 minutes until cooked - be sure to peel it before using in the recipe)
2 Tbsp butter
1 cup buttermilk
1 cup whole wheat flour
1.5 cups all purpose flour (plus more for rolling out)
1-1/2 teaspoons baking powder
1/2 teaspoon baking soda
3/4 teaspoon kosher salt

Throw warm sweet potato and butter into a mixing bowl and combine (if sweet potato was already mashed, melt the butter and combine with mashed sweet potato). Add buttermilk and combine until smooth.

Measure dry ingredients into separate bowl. Whisk to combine. Add to the sweet potato/buttermilk mixture and stir until the dough comes together. It might look a little shaggy, but that's okay.  Turn dough out onto a floured surface and knead a couple of times to get a smooth dough. Roll out to a 9x14 -ish inch rectangle (it doesn't really have to be exact).

Cinnamon Filling:

1 cup packed brown sugar
1 Tablespoon cinnamon
3 Tablespoons butter, melted

For the Cinnamon Filling:   Combine all ingredients in a small bowl. Set aside.

For the caramel topping:

1 cup chopped pecans
1/4 cup brown sugar
1/4 Sweet Potato Caramel (or you could substitute pure maple syrup)
1 Tbsp butter


For the pan and caramel topping: heavily butter the bottom of a 9x9 inch baking pan. Sprinkle nuts over. Combine brown sugar, syrup and butter in a small bowl, microwave for 30 seconds on high, then stir to combine.  Pour caramel over the nuts.

After you have all the components ready, spread filling over the dough. The filling has a wet sand kind of texture, so don't worry if you don't get it spread completely evenly -- I didn't.  ;-) Roll up dough from by the long end, trying to keep the roll as tight as you can (I admit I'm not very good at this part).  Cut dough into nine pieces. How do you do this, you ask? Cut off each of the ends, set them aside for now, then cut the remaining roll in half, then cut each of those pieces in half, then in half again.  And there you go.  Put rolls in the prepared pan, then take the uneven ends, smoosh them together a little, then use that as your ninth roll.  press each of the rolls down slightly.

Put pan into a preheated 400 degree oven and bake for 25 minutes. After pulling the rolls out of the oven, immediately turn over onto a serving plate, but keep the pan on top for 5 minutes. After 5 minutes, remove pan. There might be bits of the caramel-nut topping left in the pan. I just scrape that out and spread over the rolls.  Enjoy!  Makes 9.

Sunday, January 26, 2014

"Healthy" Caramel? Color Me Skeptical...

sweet potato caramel

When I saw this on the bon appetit blog, I thought, "Wow! Caramel sauce with no refined or processed ingredients? I have to try this!" Well, I tried it, and came away disillusioned. The recipe seemed simple enough: roast 3 pounds of potatoes in a little water, then let drain into a saucepan. Cook down the resulting liquid.

Here are the potatoes, ready to go into the oven:


Here are the roasted potatoes, draining in a cheese-cloth-lined strainer:


And, after an hour and a half of roasting, an hour of draining, and another half hour of cooking down the liquid, here is what I got:


A third of a cup of syrup (never got to a caramel-y state of thickness) that still tastes overwhelmingly like sweet potato.  At least I had enough mashed sweet potato to make sweet potato pancakes (just add some of the mashed potato to your regular pancake batter) and sweet potato biscuits.  :-)  As for the "caramel sauce", I'm still skeptical, but I saw enough promise to try it again -- roasting the sweet potatoes uncovered for longer to concentrate the sugars more might do the trick.  It just seems like a lot of time to take up just to make a small amount of caramel sauce.  Still not sure what I'm going to do with the small amount of syrup I have, though.  It seems a shame to just waste it.  Simple syrup for a cocktail, perhaps? Send me any thoughts you have!  :-)  

Friday, January 17, 2014

Savory Dutch Baby

This one's another entry in the "I'm not sure what to make, so I have to punt" dinner.  I had a bunch of egg yolks left over from the meringue experiments (see previous post), but I didn't feel like scrambled eggs, so I thought about a savory dutch baby.  A dutch baby (or oven pancake, pfannekuchen, etc.) is a simple mixture of egg, milk, flour, and salt (sometimes you add sugar for a sweet version) that's poured in a hot, buttered pan.  It's baked at a high temperature and gets all beautiful and puffy.

I've made these before, but only the sweeter version, served with either sauteed apples or maple syrup, and usually for Sunday breakfast.  This time, however, I had some cheese and bacon (what a surprise!), so I thought, "Maybe I should just add some of those and make it a savory dinner."

Let me tell you what.  It was GOOD!  A little side salad, and you've got a light dinner or lunch.  Plus, it's really easy.  Try it.  You'll like it!

Savory Dutch Baby with Bacon and Gruyere

2 Tbsp. butter
2 eggs
1/2 cup milk
1/2 cup flour
3 Tbsp bacon bits
handful of shredded gruyere cheese

Pre-heat oven to 400 degrees (F). Put butter in a 9-inch cast iron skillet (you can use a pie plate or other oven-safe 9-inch skillet) and put in the oven to melt.  Meanwhile, whisk together eggs, milk and flour until smooth.  When the butter is melted and the oven is pre-heated, pour the egg mixture into the skillet.  Return to oven and bake for 18 minutes.  Pull out the skillet and sprinkle the bacon and cheese on the pancake.  Put the skillet back in the over for 10 more minutes, or until the pancake is golden brown and the cheese is melted.

Remove the skillet from the oven, cut pancake into four pieces.  Serve with a simple side salad.


Friday, January 3, 2014

Two for One: Making weeknight meals easier


I am all about easy prep and quick weeknight meals.  An easy way to make dinner happen is to prep ingredients ahead of time, then all you have to do is throw everything together and voila! Dinner is done.  For example, this week I made a sausage and cheese strata, but cooked all of the sausage (one pound's worth) and saved the other half to put in a soup later in the week.  Similarly, I bought a whole head of savoy cabbage, but used it three ways (in a citrus slaw with roasted salmon, in soup, and as a side dish).  Makes easy work for weeknights AND it's economical.

Here's what I did:

I cooked all the sausage, along with half a chopped up onion and 4 oz. of chopped, fresh mushrooms. Beause there was some great crispy bits of sausage left in the pan, I put half a cup of water in the hot pan to scrape up all those bits of flavor, then put everything in a bowl and stored it in the fridge for later.
 

When it came time to make the strata, I ended up only using about 1/3 of the sausage, which I scattered over a mixture of 4 eggs, 1 1/3 cups of milk, salt and pepper, 5 slices of thick-cut bread (cut into 1-inch cubes) that had soaked together for about 15 minutes.  On top of everything, I scattered some grated cheddar cheese, then baked it in a buttered 8-inch by 8-inch pan at 375 for about 30 minutes (until the top was golden brown in places and the cheese was all melted).


The next night, I took half a head of savoy cabbage (it was a large head), sliced it into 1/2 inch thick slices, then sliced those slices across into 2-inch lengths.  I also took a whole onion, cut it in half length-wise, then sliced across in thin (1/4 inch) slices.  I tossed the cabbage and onions with salt, pepper, and some olive oil and roasted it on two large baking sheets in the oven at 400 degrees for 12 minutes (some of the cabbage might get dark brown, and that's okay), tossing the veggies once about halfway through.


With one pan of the cabbage, I tossed it with a little soy sauce and sesame seeds and put it away for a snack, some lunch or for a side with another dinner later in the week.

With the other pan of cabbage, I added that to a 4-quart pot, which was already simmering with 32 oz. of chicken broth and the rest of the sausage mixture that I made the day before, with a little bit of dried coriander (about 1/4 teaspoon) and dried marjoram (1/2 teaspoon).  After I added the cabbage to the pot with the other ingredients, I let them simmer together for about 10 minutes, just to let the flavors unite.


And there you have it!  Actually, the original recipe I was using was supposed to have some sweet potato in it, but I forgot.  It was okay, though, because it was still really tasty and even my picky eater liked it!

Monday, December 23, 2013

Christmukkah 2013: Tips for Entertaining


Sorry for being lame and going so long between posts, but I know you'll understand, because everyone's so busy! This late Thanksgiving thing really puts the squeeze on holiday entertaining!

It's been crazy around here, and we actually had Christmukkah earlier this year than usual, since Hanukkah was so early.  I have to admit that I didn't do anything very original this year in terms of food, but I'll post links below to everything I made.  This post is going to be more about tips for entertaining than actual cooking, because, honestly, what's better than having family and friends over, talking and laughing over good food?

So here are my tips for entertaining:

1) Don't worry so much about your house -- how clean it is, how "undecorated" it is, or anything else. Why? Because your friends won't care.  And if the people you invite over are going to judge the type of furniture you have or the size of your house, are they really worth keeping as friends?  Personally, I don't spend a whole lot of time actually cleaning before people come over, because everything's just going to get dirty again anyway. Which leads me to my next tip:

2) Don't waste your time washing the floor and cleaning under the refrigerator (people actually do that).  Just do a once-over with with a dust cloth and the vacuum, and wipe down the bathrooms with Chlorox (or other cleaner) wipes. I do, however, put away as much clutter as I can, so people have places to set their drinks or plates as they walk around. Save the really big cleaning for after everyone leaves.  :-)

3) Do make sure bathrooms have extra toilet paper and clean towels/guest cloths, for obvious reasons.

4) Do make more food than you think you'll need.  Every year I end up with food that I don't even put out on the table because people bring food with them.  However, I know that the one year I under-provide will be the year that everyone brings wine and beer instead of food (would not be a horrible party in any case, but still).

4a) make sure the extra food is shelf-stable (crackers, smoked fish, pickles) or freezable.  That way, if you end up not using it, you can keep it until your next get-together.

5) Consider your guest list and match it to the size of your space and the "feel" you want.  Christmukkah has turned into a nearly neighborhood-wide event, which is why we turned it into an open house at this point.  The first couple of years we kept it small and actually had real food and sat down to eat, but as our guest list grew, we've had to switch the format to accommodate more people.  I'm a "more the merrier" type of person, so more people showing up makes me happier than fewer.  BUT, that type of entertaining isn't for everyone, so think about what you want to get out of it, as well as your guests.

6) Match the types of food you'll serve to the amount of people invited. What I mean by this is, the more people you have coming, the simpler the food prep should be, with dishes that can be made ahead of time being REALLY important.  There is no shame in having a nice cheese platter or vegetable tray, especially if you have some interesting cheeses/crackers or dips to go with it.  Not everything needs to be individually served and elaborately hors d'oeuvres-y.

7) Focus on one "wow" offering (if that's your thing). This year, mine was going to be the Zucchini Cakes with Smoked Trout, but I never got to serve it...Going back to tip 4a, the zucchini cakes are freezable and the smoked trout came in tins, so I'm saving it to serve on New Year's Eve.  See how that works?  That being said, everyone was happy, and eating and drinking, so I didn't sweat it that I didn't get to put out my "fancy" hors d'oeuvres.  :-)

8) This is supposed to be fun, and no one will be happy if the host is not having fun.  So be sure to enjoy yourself, and if that means serving lasagna and salad because you can make it all ahead of time, then so be it.  If you thrive on wow-ing your guests with something elaborate, go for it.  But you shouldn't stress out about having people over, since, like I said, it's supposed to be fun and enjoyable.

So, my advice to you is to just start having people over more.  It's fun. It's less expensive than going out for a meal, plus you get to pick your own music.  :-)

I forgot to take pictures during the party (are you really that surprised?), but I did get a snapshot off of the food tables before people got here. Plus I took a couple of pictures of some foods I made, after the fact.  Sorry, but I was having too much fun talking to my guests.  LOL


Cranberry Cheesecake                                                 Cardamom Thumbprint Cookies


Christmukkah 2013 Menu:

Swedish meatballs with lingonberry sauce (I used the recipe from "Savoring the Seasons of the Northern Heartland". The lingonberry sauce was store-bought, 'cause nobody got time for makin' lingonberry sauce from scratch…especially when you don't have access to lingonberries)

Picture of Lemon-Garlic Chick Pea Dip with Veggies and Chips Recipe

Lemon-garlic Chick Pea Dip http://www.foodnetwork.com/recipes/rachael-ray/lemon-garlic-chick-pea-dip-with-veggies-and-chips-recipe/index.html

Zucchini Cakes with Smoked Trout recipe

Zucchini Cakes with Smoked Trout http://www.epicurious.com/recipes/food/views/Zucchini-Cakes-with-Smoked-Trout-359333


Stuffed Dates http://www.beyondthepeel.net/2012/12/goat-cheese-stuffed-dates-recipe.html - I did change this up a little and used orange peel, rosemary and thyme in the goat cheese. Since dates are so sweet, I wanted to cut through that a little bit. Also, instead of nuts, I did do the pomegranate seed variation.
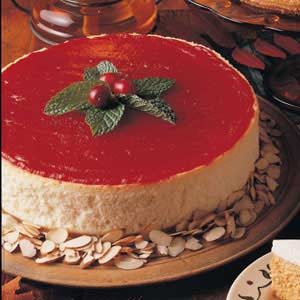
Cranberry Cheesecake Recipe

Cranberry Cheesecake http://www.tasteofhome.com/recipes/cranberry-cheesecake


Almond Cardamom Thumbprint Cookies http://www.outside-oslo.com/2013/11/29/cardamom-thumbprint-cookies-with-a-scandinavian-touch/

All of these were delicious (the photos are copied from the linked websites -- they're too nice to be my work!) and I would make any of them again.

Wednesday, November 20, 2013

Caramel Apple Crisp Bars


So, if you are following along with my previous posts, you probably have boatload of apple butter.  I know I did.  And, after a while, putting it on toast or muffins (insert your own joke here…) isn't cutting it anymore.  We still have some in the freezer, too.  So I came up with Caramel Apple Crisp Bars to help use some of it up.  They're really yummy.  You should make them.  :-)


I realize that you can't really see much of the bar underneath the mound of ice cream, nuts and caramel sauce, but my older son had this serving idea, and it was delicious, so I thought I would give you another idea to use (and reason to make this recipe).


Caramel Apple Crisp Bars

1 1/4 c. old-fashioned oats
1/2 c. all-purpose flour
1/2 c. brown sugar
1/3 c. butter, cold
1/2 c. walnuts, chopped
3/4 cup apple butter (homemade or not)
1 small apple, peeled and chopped (about 1/2 cup chopped)
1/2 c. caramel sauce (you can use anything you have on hand, but I highly recommend this recipe for Apple Cider Caramel Sauce from Southern Living)

Combine oats, flour, and sugar in a medium bowl, breaking up and clumps of brown sugar.  Cut the cold butter into cubes, then add to the bowl. Using a pastry blender or your fingers, incorporate the butter until the mixture is uniform sizes and crumbly.  Add walnuts and stir to combine. Set mixture aside.


[Alternate method: put oats, flour, sugar, butter and walnuts (chopped or not) in a food processor.  Pulse about 5-6 times to combine.  Butter pieces should be the size of small peas.]


Combine apple butter and chopped apple in a small bowl.  Set aside.


Butter the bottom of an 8x8 inch pan, then pour half of the oat crumb mixture in the bottom of the pan and pat down a little.  Drop spoonfuls of the apple butter/apple mixture on top of the crumb mixture, then gently spread around to evenly distribute over the crust. Combine the caramel sauce with the remaining crumb mixture, then drop by spoonfuls over the top of the apple butter layer.


I need to confess something on this step.  Initially, I put the rest of the crumb mixture on top and was going to drizzle the caramel sauce over it, but then I thought the caramel might burn before the bars were done baking, so I scraped off what I could and put it back in the bowl, then stirred the caramel sauce in to what I had.  That's why it looks kind of funky, but yours will be much prettier!

Put in a pre-heated 325 degree oven for 35-40 minutes (top should be golden and edges will be bubbling.


Cool completely.  Cut into squares and serve.  Makes about 16 (if you like them bigger) or 20 (if you like them smaller).  :-)